Showing posts with label Birthday. Show all posts

Wednesday, November 2, 2011

SUPER belated Happy 94th Birthday, Noni!

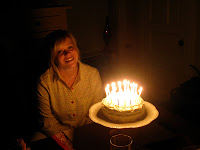
So, Noni turned 94 back in July and we celebrated her birthday when Stephen and I moved back at the very beginning of August.  Because things have been so out of whack, I haven't shared with you pictures from her birthday celebration.  Noni is Stephen's maternal grandmother.  She is 100% Italian, having moved to the states from Sicily when she was in her late 20s.  Noni might be one of the cutest and sweetest old ladies that I've ever met.  It might have something to do with her broken English whenever she says things like, "Close the lights" or "You, Eat!" :).  Happy Belated Birthday, Noni - I can't wait to celebrate many more to come!

My sister-in-law, Ashley decorates cakes on the side and so she made this one for Noni's birthday.  The cool thing about this cake is that Stephen's little sister, Cali is pregnant.  Our extended family didn't know what she was having (boy or girl - including Noni), so the cake was colored to reveal which it was.  Watching Noni's face as she found out was priceless!

Sweet Noni blowing out her candles.

She really is so cute - this is her clapping for herself after blowing out her candles.

Noni's going for the cut - as you can see, Stephen's mom (can you tell that Noni is her mom?!) is anxiously awaiting the reveal to see everyone's reaction.  

The cake is pink!  They're having a girl!!!  (If you can't tell by this picture, Noni is crying...this is a normal occurrence for Noni.  When she's happy, she cries happy tears; sad, sad tears; scared, scared tears...you get the drift!)

Stephen and his sweet Noni.  Bet you can't tell they're related, can you (do you sense the hint of sarcasm that I laid on that statement)???

Here's all of us with Noni, including Stephen's cousin, Julie.  We're missing cousin Michael and his wife, Terry, and that would make it a complete picture of Noni and her grandchildren, their spouses and her great grandchildren.

Jake is Stephen's older brother's son.  He was helping Noni open gifts - Jake loves his Noni.

I couldn't pass up this sweet photo-op of Halle (Stephen's older brother's daughter) and her Nunu (Stephen's dad).


Tuesday, July 5, 2011

Happy 1 Month Birthday, Elliott!

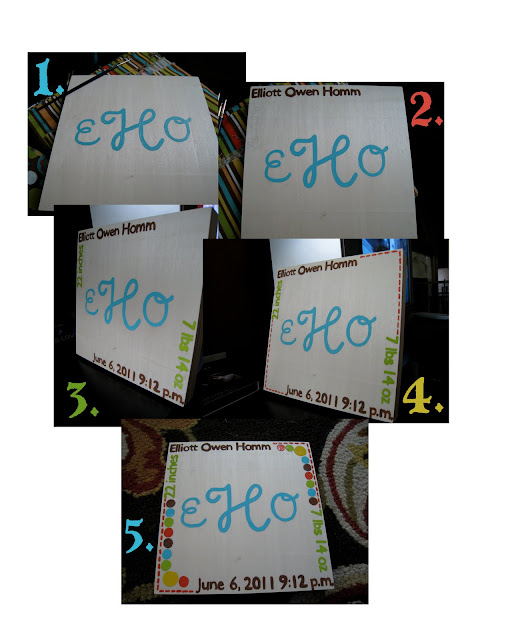
I knew right when I found out that my sister was pregnant that I wanted to make a sign for the baby's room.  Because they waited to find out whether or not the baby was a boy or girl, they also waited to name *it (we now know it's a he).  So, I had to wait until the baby came and a name was decided upon in order to get my crazy hands working!  Using the same method that I used to make this and this, I set out to make Elliott's sign.


My supplies:
- 8x8 wooden sign from Michaels
- 1.5 inch wired turquoise ribbon from Michaels
- fabric from Elliott's baby bedding (for color direction)
- coordinating acrylic craft paint
- personalized print-outs of Elliott's initials, full name, birth date & time, weight and length
- paintbrush (not pictured)
- pencil (not pictured)
- tape (not pictured)
- clear spray paint (not pictured)
- staple gun (not pictured)

The Gist:
- Figured out what I wanted my sign to say and then picked the font & size, printed & cut it out.
- Shaded the back of the cut-outs and then arranged them where I wanted them on my board.
- Going cut-out by cut-out I taped the paper on and then, using a pencil, traced the words onto the board:
Can you see here where I started with Elliott's monogram? 

- After tracing on each individual set of wording, I painted it:

Here's what it looks like with the inspiration fabric in the background

- Once I was finished painting the front, I painted the sides brown:

- Sprayed a coat of the clear spray paint over the sign
- Cut out 2 pieces of turquoise ribbon (long)
- Measured 2 inches from either side and marked it on the back of the sign
- Using the markings as a guide, I stapled my ribbon to the back
- Tied a bow with the 2 pieces
- Hung it on the wall
- Smiled while looking at it as it reminds me of my want-to-squeeze-forever nephew:

Happy Birthday, Baby Elliott!
I love you more than you'll ever know!


I'm partying here this week :)


Saturday, March 12, 2011

Reusable Grocery Bag

Sew4Home is a website that I check every day.  Literally, I check it every day.  It takes me all of 2 minutes to click to the site and see if there is anything that strikes my fancy.  I get sad on the weekends when I go to it and realize that it's the weekend and they've posted nothing.  But then I get happy because it's the weekend and...okay, enough already!  A month ago I checked it and was immediately interested in creating the tutorial that they had featured.  It was a reusable grocery bag.  I also knew who was going to be the lucky (I'm assuming she likes it) recipient of my try at this tutorial - my friend Amy (her birthday was last week).  I went to Joann's when they had their big Presidents Day sale and picked out some fabric that I felt said, "AMY" and then I went to town!
front

side

top (I added some "groceries" from my pantry)

And then I decided to take it one step further...I executed the good ol' wax paper method and cut out Amy's initials to add to the side of the bag.  Amy's a southern woman and kindred spirit who appreciates anything with her monogram on it!
Ta-Da!  
What do you think?  Let me tell you, I made a mistake here and there, but it's my first try.  This seriously was not a difficult tutorial to follow and I suggest that everyone get out there and make them self (or someone they know) a reusable grocery bag!


I've linked this project to these parties:

Saturday, August 7, 2010

Happy Birthday!

Happy Birthday to one of my best friends, Katie!  Her birthday isn't actually until tomorrow but I try to not to blog on Sundays, so today will have to do :).

I first met Katie the summer going into 4th grade as we were on the same recreational soccer team together (GO SHOOTING STARS!!!) ;)  We played soccer together off and on again up until high school and then we were in the same circle of friends in high school.  It wasn't until we were freshmen in college that we became close friends, and now I would say that she is among my top friends (Katie, if this were Facebook, I'd put you in my "top friends" section :) )


{roomies}


{the crayon smell in my beetle went to her brain...}
{we're great dance partners}
{my first and ONLY trip to Keeneland...HOW IS THAT POSSIBLE?!}
{we were looking high and low for the perfect Christmas tree}

Happy Birthday to someone who is amazingly similar to me in so many ways yet different enough to where we can hang out, live together and not get sick of one another!
I hope you have a great day tomorrow!!!
p.s. head over to Katie's blog and wish her a happy birthday!!!

Friday, August 6, 2010

Sequels to some of my favorite projects

Do you remember this?  How could I not make another one for my best friend, Doni?  This pillow SCREAMS Donielle!!!  Here's her new, sassy pillow:


For those of you who know Doni, what do you think, she'll love it right?
What about these, do you remember how much I loved them?
Well a couple of weeks ago I was invited to a birthday party for one of my friends in grad school.  I thought these would make the perfect gift for her.  She thought I was a little bit weird when I asked her what her color scheme was in her kitchen (pink and red), but I don't mind being thought of as the weird type...it happens often.  Here are the ones I made for her:


And here's a picture of them adorning her stove:


I love these two projects - they're super easy and the outcome is great!  If you're interested in making some of your own, be sure to go back and check the original post that I've linked them to and that will lead you to the tutorials.

What about you?  What have you been making/crafting/scheming?


Saturday, April 10, 2010

Review: The Vintage Pearl


I mentioned a couple of weeks ago how I had ordered a necklace from this shop online.  I got it in the mail last week and was SO pleased with what I found when I opened it!
We got this necklace for our sister-in-law, Ashley as a very belated birthday/early Mother's day gift.  If you can't see what the charms say, they have her 2 kid's names on them and then have their birthstones next to them.  Also, I was so impressed with how shiney and beautiful the chain was.  When I saw it online, I was a little skeptical because of the look of it, however when I opened the package and saw it, I was pleasantly surprised!  
The order took awhile to get, although it was totally worth the wait!  I would definitely order from the vintage pearl again!
p.s. I did this review on my own without any prompting or requests from the vintage pearl.

Saturday, March 6, 2010

Happy Birthday to Dad Corsi!

Today we're in Louisville to celebrate Stephen's dad's 60th birthday!  I can't believe he's 60!  He doesn't look OR act a day over 40 (I'm beginning to have a new perspective on what's "old" and what isn't and while I used to think of 60 as being "old" I no longer do).  He still works full time, takes care of the yard, the house and goes for runs daily with the dog.  60s are beginning to look like the new 50s!  Stephen's precious mother has sweated, worried, and been in a state of angst for the past 3 months...why?  Because she decided to throw him a surprise birthday party - mailed invitations, had me put together a slideshow, had people write him letters - the whole shebang!
Tonight's the party...we'll see if he's surprised.  We had a family celebration last night for dinner (his actual birthday).  This was to serve 2 purposes: to throw him off and make him think that was the end of the celebrations AND to actually celebrate on his actual birthday.  I hope it worked!
Today I'm so very thankful for Stephen's dad and all he's been to the Corsi family.  He's been an amazing man, husband and father.  He has worked hard to provide for his family and saw to it that his wife never had to work and was still ever present in his kid's lives.  Stephen is doing a Bible Study with his Small Group called Men's Fraternity.  Lately it's been talking about the importance of a good father and how to be a good father one day.  Stephen came to the realization that everything they've talked about so far he sees in his dad.
I married an amazing man.  He is far more compassionate, patient, loving and kind than I could ever hope to be.  I don't doubt for a second that he'll make an unbelievable father himself one day.  I can't help but be grateful to his dad for helping to mold him into who he is today.
Happy birthday Dad C.!

Friday, January 15, 2010

I love birthdays and I love my best friend...


 Last weekend, 2 of my best friends (Donielle and Laura) came to Chicago despite the cold and snow to see me!  Not only did I get the privilege of hanging out with them, but I also got the privilege of hanging out with Doni on her special day...her birthday!  Because I knew Doni had sacrificed hanging out with anyone else on her day so she could hang out with me, I wanted to make it extra special...so I made one of these!  It was fun to make and it something that I know I will enjoy getting out and hanging for all the birthday festivities of family and friends.  Interested in making one?  It's super cheap, super easy and super fun....here's how:

You will need: *paper letters *scrapbook paper *poster board *rubber cement *Mod Podge *ribbon *scissors *sponge brush *ruler
1. I went to Shabby Princess and downloaded the letters.
2. I went to Microsoft Word and imported each letter.  They were really big (took up the entire page) when I imported them, but I kept them that large (will explain later).
3. After I had imported all 13 letters, I had 13 pages according to Microsoft Word.
4.  Before I printed I went to File-->Print-->Layout-->and changed the pages per sheet from 1 to 4.  This way when I printed 4 letter came out to a page making it a total of 4 pages total.
5.  I cut out each individual letter.
6. I went to Hobby Lobby (my drug of choice) and picked out different scrapbook paper that I loved.  In this case I decided to go with the theme of Polka Dots and do a variety of colors - who doesn't love the rainbow?!
7. I cut my scrapbook paper to my desired size (enough to border the cut out letter when I glued them on there)
8. I then rubber cemented each piece of scrapbook paper to poster board.  Once this dried, I cut the poster board out (this ensured the durability of each piece).
9. I rubber cemented each letter to each piece, eyeballing it to go in the middle.
10. I took Mod Podge and covered each letter (again, to ensure the durability of the sign).
11. I used a pair of scissors and "drilled" a hole (1 in each side) of the letters so that I could knot some ribbon in there.
12. I eyeballed the length of ribbon needed for in between each letter.
13. I hung it up and had birthday festivities with it! :)
***I think this can go without being said but this could work for anything - you could make a Christmas or Thanksgiving "banner" to rehang year after year.

I also was DYING to try something else out so I did it!  I made a rainbow cake!  Who better to make a rainbow cake for than my best friend Donielle who is like a rainbow, SO FULL OF COLOR!

Here is where I got the idea and you can find the step by step instructions there, but I will provide them for you here so you don't have to go there unless you're interested in the Weight Watchers version of it.  This was NOT an original idea, although it was SUPER fun to do!

So here is what you need:
*1 box of white cake mix
*all the ingredients for your cake mix (follow the box)
*food coloring (I just bought the regular, run of the mill coloring from the grocery store).
*icing
*6 small bowls (you'll have 6 different colors of batter)


First, you simply mix your cake as if you were making an average, everyday cake...

You then get out your 6 different bowls and divvy up your batter as equal as possible...


You then use your food coloring to color each individual batter bowl it's assigned color - I did red, orange, yellow, green, blue, and purple.  They sell food coloring in neon colors so you could do a neon rainbow if you wish.  I just followed the back of the food coloring box to try to get the shade I was going for...


You then take your 2 well greased circular cake pans (I used 8" pans) and you pour your batter in.  In the 1st pan I poured half of each color in going in the order of the rainbow: 1/2 of the red batter, 1/2 of the orange, then yellow, then green, then blue and then purple.  In the 2nd pan I poured the rest of the batter only I went in the opposite color direction starting with purple, then blue, green, yellow, orange and then red...


Lastly, after they had cooled completely, I leveled off 1 of them and stacked them as normal and then iced them with Doni's favorite icing (appropriately: Rainbow Chip), making her think that I had made her normal Fun-Fetti birthday cake as she gets every year...

I then waited to surprise her with her colorful cake....


....taste the rainbow!

I've linked up to: Keeping it Simple; It's So Very Cheri; Sumo's Sweet Stuff; The Girl Creative; Making the World Cuter; Between Naps on the Porch; Bird Crafts; Persimmon Perch; Tools are for Women Too; Under the Table and Dreaming; The DIY Showoff; Domestically Speaking; C.R.A.F.T.; Hope Studios; All Thingz Related; Tip Junkie; Sugar Bee; Lucky Star Lane; Today's Creative Blog; My Delicious Ambiguity; The Gypsys Corner; New Nostalgia; Dirty Hands, Beautiful Life; Seven-Thirty-Three; Me and My Bucket; The Trendy Treehouse; My Backyard Eden; Blue Cricket Design; Someday Crafts; The Thrifty Home; Bobbypins Boardwalk; Sew Much Ado; Santa's Gift Shoppe; Somewhat Simple; Life as Lori; The Shabby Chic Cottage; House of Hepworths; The Train to Crazy; Fireflies and Jellybeans; The Shabby Nest; It's a Hodgepodge Life; Someday Crafts; Fun to Craft; A Few of My Favorite Things; Home is Where My Story Begins; Tidy Mom; Chic on a Shoestring Decorating; Decor Mama; Fingerprints on the Fridge; Kojo Designs; Tatertots and Jello; Funky Junk Interiors; Along for the Ride; Under the Table and Dreaming; I Heart Naptime with Chocolate Sundaes