Showing posts with label Sewing. Show all posts

Tuesday, February 26, 2013

My First Quilt

Hello Blogland!  I've sure missed you!  This week I am enjoying time off of school.  When our district put together our calendar this year, they added a week at the end of February for make-up snow day in case we needed them.  Thankfully, we've only had 1 snow day, so school was in session on Monday, and it's out the remainder of the week.  PRAISE GOD FROM WHOM ALL BLESSINGS FLOW!  This week couldn't have come at a better time!

I figured I could get caught up on a million and one projects I've done and have wanted to share with you!  The first one is a quilt I made this past summer...my very first quilt!  It definitely won't be my last!!!  A dear friend emailed me and asked me if I'd be willing to make a quilt for her little man.  I had always wanted to try my hand at quilting (especially because one of my besties is a master quilter), but never had a good reason to.  Thankfully this dear friend is also a very flexible person and was so easy to please!  I used a variation of different ideas, mainly following this idea of a quilt without a binding.  The main blog that I went to for sewing (and emotional) support was Diary of a Quilter - using her quilting tutorial.  Let me tell you, if you can sew a straight line, then you can make a quilt.  It's as simple as that!

First things first, the fabric had to be chosen.  She wanted something brightly colored that was gender neutral so it could be used for her little man and then again if some little ladies were in her future.  She settled for "Half Moon Modern" by Moda.  A charm pack (42 5" squares) was purchased:


Unlike the quilt without a binding tutorial, she did want a fabric border on the front of the quilt around the squares, and so we settled upon the grey small dots from the "Half Moon Modern" collection:


For the back, she chose the larger grey dots to compliment the front:


The other supplies needed was batting to go on the inside of the quilt, and coordinating thread - I just used a white thread.  For the batting, I purchased "warm and natural cotton batting - crib size" from Joanns.  After all the fabric was in and the batting was purchased, I was ready to get started.  

Please forgive my picture quality...I used my phone and I have none taken with a real camera...
The first step was to figure out the pattern/sequence of the charm squares.  With the help of my sister and mom, I finally decided upon this:


The key here was to make sure that none of the small dot grey was on the outside because I didn't want it to blend in with the border I was going to put around it. 
Once I settled upon the sequence, I made rows by placing the squares right sides together and sewing a 1/4" seam.  Once all my rows were made, I pieced them together one by one and connected them.  After all the squares had been pieced together, I used Diary of a Quilter's quick method for adding borders.  I pieced them together with the sewn together squares, and voila!  I had what was looking an awful lot like a quilt!


I was now ready to sew my batting to the back of this piece.  I cut my batting the size of this piece of fabric and then safety-pinned the pants off it!  After safety pinning it, I chose 3 vertical seams and "stitched in the ditch" (sewed along these seams) to attach this front piece to the batting.  Once the batting was in place, I cut the piece of my back fabric the same size as the front piece:


Now I was ready to get jiggy wit it (na na na na na na na).  I pinned the back piece of fabric to the front piece of fabric right sides facing each other.  I then proceeded to stitch all the way around the edges of the 2 pieces a little less than 1/4" in. I left a small opening so that I could turn the fabric pieces right side out, and then I stitched the opening close by stitching all the way around the edges of the right side turned pieces.  Once I was finished with that, it was time to "quilt" the pieces.  You can get all fancy with this step, but I stuck to the basics.  I decided to "stitch in the ditch" throughout the entire quilt.  Here's what the 'beaut looked like when I was done:

The front

The back

I don't think I've ever been as proud of a finished sewing product as I was of this project.  I was smiling from ear to ear and was all over the internet looking for my next charm pack to make my new quilt!  Unfortunately I haven't made another one since this one, but I definitely look forward to trying my hand at it again, something REALLY soon!  What about you?  Have you every quilted?  If not, what's holding you back???


Tuesday, May 22, 2012

Randomness In Numbers

It's been waaaaay too long since I came on here and promised you I'd be back...I wasn't lying - although I was very slow at my return.  Apologies.  I know your life has been on hold while you've been checking my blog feverishly on a daily basis (I kid, I kid!).  There's so much swarming around in my head - so many thoughts, projects, feelings, ideas, stories...today just seemed like an appropriate "random" day.  What better way to share with you what's been going on, than through a random post - with numbers?  Here we go!

5 - the number of school days left with students....I am so ready for this summer break.

1 - the number of new students that I got today....5 days left into the year.....that don't speak a word of English.

3 - the number of custom baby bedding orders I'm currently working on - are you pregnant, or know someone who is???  Change that number!

2 - the number of dead birds my dog has brought me over the span of 2 days.  He was incredibly excited and thrilled by his offering.  Too bad my anger and disgust really threw him off.

6 - the hour of the morning that Stephen and I awoke on Saturday to find ourselves still in our Friday clothes, on the couch, with the dog, and the t.v. on...ay yi yi!

4,567,921 - the number of projects I have on my mental list of things to do this summer.  Will they all even be possible???

2 - the number of students who called me a "snitch" on Friday - to my face.  Please refer to my first random number.

4 - the number of nieces and nephews I have that I've been able to see on a weekly basis now that Stephen and I live in Louisville.  There's nothing like seeing your baby nephew so often that he smiles when you come into the room!

582 - the number of recipes I have pinned on my Recipe Pinterest board...someone better get cooking!

4 - the number of recipes I have actually tried from my Recipe Pinterest board - at least I was pleased with every one of them!

1 - the number of baby pools Stephen and I have purchased in our lifetime.  This baby pool was not for our baby (considering we do not have one), but instead for our dog - in a last ditch effort to keep him out of our pool in the backyard.

20 - the day in June that I have to take time out of my summer break to drive to Bowling Green for a Conference for school.  PTL for family in Bowling Green - let's get some good family time out of the random work day during the break!

3 - the number of times that Stephen has converted into a 5 year old little boy while he's explaining to me what Bear Country is in South Dakota and how much he can't wait to visit (a trip we have planned this summer)!

4 - the week of Couch to 5K I'm getting ready to start this week...here's to hoping I'm more consistent with my runs this week than last.

6 - the number of pictures I have to share with you to make this post even more random, but less boring :)


Princeton - or P-ton, as we like to call him, enjoying his new pool!
Here's to hoping this keeps him out of ours!
Cakes I made for a friend's baby's first birthday.  That
homemade fondant is just so good!

P-ton sleeping on the couch...he's hard not to snuggle,
which then leads to waking up next to him at 6 am.
The lilies we have growing in our pond in the backyard -  they are gorgeous!  This was
not our doing, we're just reaping the benefits of the previous owner's plantings.
Exhibit A of why living in Louisville is nice. Randomly celebrating a
handsome man's pre-school graduation is always a good time!


Exhibit B.  This little guy is just too much fun!


Wednesday, August 17, 2011

Applique Nursery Pillow Tutorial

A couple of weeks ago I guest posted over at Lemon Tree Creations.  If you missed that post, you can read it below or you can go here to see the original listing...

For those of you who don't know, my sister had a baby a little over a month ago.  I was so excited when my nephew came, as it gave me my first "biological" nephew and it gave me a reason to practice honing my skills at making baby bedding.  I've been feverishly working hard to get his nursery ready for him.

 
Pictures of the baby bedding, which inspired my nursery project

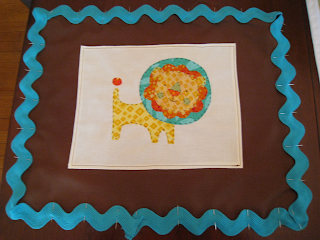
After making the bedding, I decided that I wanted to add some decorative touches to the room.  I decided that I was going to take the animals that were in some of the fabric and make an applique pillow.  There were all of these cute safari animals on one of the patterns of the fabric (the fabric I used to make the bumpers) and so I chose the lion as the inspiration for my pillow.  


Materials Needed:
-Inspiration for applique design (I used fabric from his bedding)
-Material for pillow (1/4 yard - I used basic brown fabric)
-Material for the background of the lion applique (1/8 yard - I used muslin)
-Fat quarter packs from Joanns in the colors you need (I got a yellow, orange, green and teal set because those were the colors in my lion inspiration)
-Floss and needle for appliqueing (I used brown floss)
-Ric-Rac for a decorative edge to the pillow (this is optional; I used leftover teal ric-rac from the blanket)
-Fusible interfacing
-Tissue Paper
-Pen
-Scanner
-Scissors
-12"x15" Pillow Form

What I did:
the logistics...
1. I took tissue paper and I traced the animal off of the fabric that I wanted to applique, in this case it was the lion.
2. I scanned the image into my computer and resized it to the size I wanted that would be big enough for the pillow.
3. I printed off the resized lion image and set it aside.
4. For my pillow cover I went on ahead and cut the three pieces of fabric I needed to make it (I made an envelope cover instead of one that zips on).  My pieces were 13"x16" (for the front piece) and then two back pieces, 13"x8" and 13"x14".  (for a step-by-step guide to making an envelope pillow cover, click here).
5. I took the 2 smaller back pieces of the pillow (13"x8 piece and the 13"x14" piece) and I ironed down a half inch down the 13" side of both pieces.  I then sewed it down to make a finished edge.

6. I used my printed out lion to decide how big of a piece of muslin I wanted to put as the background to my applique, in this case it was 9"x12".
7 I took my rectangle piece of muslin and ironed down about a 1/4" seam all the way around.  
8. I pinned my rectangular muslin piece to the center of the 13"x16" piece of fabric that would be the front of my pillow.  

9. I sewed the muslin piece onto the front of the pillow, being sure that I sewed close to the edges to catch the folded part underneath.

getting to the applique....
10. I took my fabric and figured out what pieces of the lion would be what colors (i.e. the body and face were yellow, the tail and mane were orange, etc).  I then ironed on the interfacing to the back of the colored fabric I would be using.
11.  I took my computer print-out of the lion and began to cut each piece - going off of color - (i.e. I cut out the body and worked with it; then I cut out the circle around the mane, then I cut out the mane, etc) and then proceeded to trace and cut it out of the coordinating fabric (with interfacing already ironed on).

12. As i finished one part of the lion, I cut out another part and continued to use that as a pattern to cut out the pieces from the coordinating color fabric for the whole lion design.


13.  I laid my cut out fabric out on the muslin and arranged it to look like the lion.  I then ironed it to the center of the muslin rectangle.

14.  Using floss and a needle, I hand-stitched a simple stitch all the way around the perimeter of each piece of fabric that made up the lion's body.


it all comes together...


15.  After the applique was hand-stitched, I took my ric-rac and pinned it all the way around the perimeter of the piece of fabric that would make up the front of my pillow, on the right side of the fabric.  I made sure that the ric-rac was "hanging off" the edge of the fabric.

16. I sewed on the ric-rac.
17. I then proceeded to take my two smaller back of the pillow pieces and pinned them, right sides facing in, to the front piece of the pillow.
18. After pinning, I sewed all the pieces together, following the sewn line that I had just made when sewing on my ric-rac.

19. I turned my pillow right side out and fell in love with it right away!


I couldn't be happier with the result and I can't wait to see this pillow in action as it livens up the baby's room!  Pillows are a wonderful way to liven up any room, and an applique pillow is great for a beginning sewer.  If you have any questions when following this tutorial, don't hesitate to ask; I'd LOVE to help you!
Whenever I get a chance and a break from life (hahahaha!) I'm going to do this exact same project, only with the giraffe instead.  Come and check out my blog and see how it turns out!  

Friday, June 10, 2011

Baby Elliott's Blanket

I finally finished Baby Elliott's blanket!  Now all that's left is the fitted crib sheet.  This kid's nursery is going to be styyyylin'!


I used this tutorial at Sew4Home except made my blanket 36x50 instead of 36x36.  

Here's a recap of his nursery bedding all together so you can see how cute it is:
The crib skirt

The bumpers

I'll be sure to show you the fitted sheet whenever I get a chance to make that!  When the whole nursery is up and running, I'll be sure to share pictures with you!

Tuesday, June 7, 2011

I'm an Aunt...again!

So, many of you who have been following my blogs and posts know that my oldest sister, Melissa and her husband, David were preggers.  Her due date is June 13 and they opted to not find out the sex of the baby. Aside from really wanting a healthy baby, Melissa wanted a little girl - again, the health of the baby was the upmost priority.  It was fun all nine months long not knowing the sex and just thinking about what it would be like if it were a boy or if it were a girl...it's a really LONG story and it's nothing inappropriate at all, just too long to type out, but we starting affectionately referring to the little babe as "Ho".
I really wanted Ho to come this past weekend so that I could get down to Louisville to meet "it".  Unfortunately, little Ho did not come, but I decided to spur on "its" arrival by working on "its" bedding.  If you remember, I made Ho's crib skirt and this past Friday I made "its" bumpers:

Let me tell you, working on little Ho's bedding worked like a charm...my sister's water broke on Sunday morning and she headed to the hospital on Sunday night.  By yesterday morning she was on the roller coaster that is known as labor - dilating, then stopping, dilating, then stopping.  After a loooong day yesterday she finally had little Ho.  And I'm pleased to announce that "its" a beautiful, healthy baby BOY! :)
(sorry for the blurriness - these were taken on my sister's phone)
Here's little Ho looking like my dad (or Pop)

And there he is again - all 7 pounds, 14 ounces of him!

For now, Little Ho is still Little Ho because no name has been decided upon.  Needless to say my mom (Grandmama) and dad (Pop) are tickled pink.  My mom always wanted a son and God blessed her with 3 girls...you never second guess the plan of our Maker, He knows what's best, and I know that this little guy is going to be a huge blessing to our family!  Little Baby Boy Ho, Uncle Stephen and Aunt Kari love you and we can't wait to get our hands on you!  Mama Melissa, you better watch out!  Aunt Kari is going to spoil the socks off this little guy!

Monday, May 16, 2011

Custom Baby Bedding

Okay blogging friends, I've had a lot of encouraging responses from my baby bedding photos that I shared with you last week.  As a result, I'm going to offer up my services to any of you preggo readers or readers who have friends/family members who are expecting.  I am willing and able to make the following pieces out of fabric of your choice:
-Crib skirt (ruffled or straight edged <--as shown in the photos)
-Fitted crib sheet
-Bumpers
-Quilt/Blanket
-Window Valance
-Decorative pillow
-Changing pad cover

If you're interested in finding out about pricing, timing, etc, please shoot me an email at KariG29@gmail.com and make the subject "Baby Bedding".  I looooooooove fabric and I love to sew - I'd love to work with you!

Magnificent Mondays: Magnificent Blogs 59

Jess is quite the sewer and she makes me want to sew everything in the world!  She is super inspiring with her great clothes for little girls.  I hope to try my hand at some of her sweet little dresses!  Not only does the blog have wonderful tutorials on sewing clothes, but Craftiness is Not Optional has great tutorials on a bunch of other things as well!

If my sister has a sweet little baby girl, I definitely want to make this dress for her!

Check out this super sweet little dress!  For the love!

Looking for a gift for a sister, mom or best girl friend?  How about this adorable half apron?

I definitely need to follow this tutorial for making a new ironing board cover - mine is the pits!

I LOVE this poinsettia Christmas tree skirt - SO pretty!

Head on over to Craftiness is Not Optional and be inspired to sew!!!

Happy Blogging!


Friday, May 13, 2011

Finally! Some pictures of baby bedding!

Do you remember when I told you that I was going to make my friend, Shea's baby bedding (if not, you can read about it here)?  Well, after I had told you about this adventure, I quickly got to work ordering fabrics from Fabric.com.  After getting them in the mail and seeing that the colors looked completely different in real life than on my computer screen (go figure) I sent them back (they have an AMAZING return policy) and ordered new Amy Butler patterns.  I loved the advice that my friend Cory gave me regarding doing Minky Dot on the inside of the bumpers, so that's exactly what we did!
Here's sweet Shea and beautiful Naomi, or Omi as they call her...this was a few short days after she arrived!
And now, she's anxiously awaiting (or napping through her anxiety) the call from IU that she's been accepted as an early applicant (Moms and Pops are both IU grads) :)


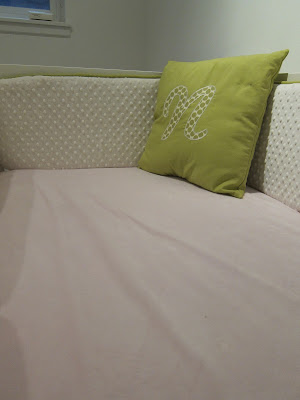
Anyways...I got busy working on the crib skirt, the bumpers and the blanket and I finally have pictures to show you!  Unfortunately, the blanket didn't make its debut in any of these pictures, but you can enjoy the rest :) (With the extra fabric I made a pillow with an "N" on it for Naomi).


And there it is!  The blanket was the floral fabric on one side and then a deeper pink on the back with the green as the binding....maybe Shea will remember to take a picture and send it so I can share it with you - although she is a bit busy now that Omi is around :).  I was super pleased with the outcome, so much that I decided to torture get myself into it once again for my sister!
***If you're interested in custom baby bedding for you or someone you love, click here***

I've linked this project up to these parties:

Because I Love My Sister...

Do you remember when I decided to make my friend, Shea her baby bedding?  Well, I did just that and was super pleased with the outcome!  Maybe one day, when she remembers to send me the pictures, I will share with you those results...

Until then, I'll share with you the projects that I'm working on for my sister's baby.  The little bean is due in June and they have decided to not find out the gender (what fun!).  They're painting the nursery a light lime green and are going with a cute safari theme.

This is the book that I've used to create the dust ruffle/crib skirt.  I LOVE IT!  I had originally borrowed it from the library and then decided to bite the bullet and purchase one for myself.  It's chocked full of great sewing projects including the dust ruffle that I've finished:
Here is the side view of the dust ruffle.  In between those two panels are:

...a few animals that will peak through when the dust ruffle is under the mattress.

Here's and end view - the end panel is made up of the animal fabric.

And then here's another view of the animals peaking through the side panels.

As for the rest of the bedding, I'm going to be making her bumpers and a blanket that will match the skirt.  The bumpers will be a combination of these:
This jungle fabric will be the outside of the bumpers...
The turquoise minky-dot will be the inside of the bumpers while the orange polka-dot will be the piping and the ties.

The blanket is being made using this tutorial from Sew4Home - I'm just going to make it bigger than the receiving blanket size.  It will look like this when I'm done:

I'm using this cotton fabric for the one side:

And then the other side and the ric rac will be:

As soon as I'm finished, I'll be sure to show you!  Keep your eyes pealed for the results from my friend Shea's baby bedding - I'll get those pictures out of her!