Showing posts with label Blogs. Show all posts

Wednesday, August 17, 2011

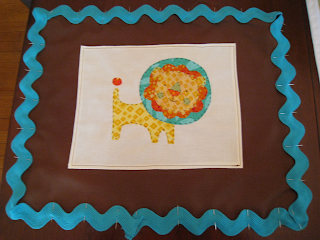
Applique Nursery Pillow Tutorial

A couple of weeks ago I guest posted over at Lemon Tree Creations.  If you missed that post, you can read it below or you can go here to see the original listing...

For those of you who don't know, my sister had a baby a little over a month ago.  I was so excited when my nephew came, as it gave me my first "biological" nephew and it gave me a reason to practice honing my skills at making baby bedding.  I've been feverishly working hard to get his nursery ready for him.

 
Pictures of the baby bedding, which inspired my nursery project

After making the bedding, I decided that I wanted to add some decorative touches to the room.  I decided that I was going to take the animals that were in some of the fabric and make an applique pillow.  There were all of these cute safari animals on one of the patterns of the fabric (the fabric I used to make the bumpers) and so I chose the lion as the inspiration for my pillow.  


Materials Needed:
-Inspiration for applique design (I used fabric from his bedding)
-Material for pillow (1/4 yard - I used basic brown fabric)
-Material for the background of the lion applique (1/8 yard - I used muslin)
-Fat quarter packs from Joanns in the colors you need (I got a yellow, orange, green and teal set because those were the colors in my lion inspiration)
-Floss and needle for appliqueing (I used brown floss)
-Ric-Rac for a decorative edge to the pillow (this is optional; I used leftover teal ric-rac from the blanket)
-Fusible interfacing
-Tissue Paper
-Pen
-Scanner
-Scissors
-12"x15" Pillow Form

What I did:
the logistics...
1. I took tissue paper and I traced the animal off of the fabric that I wanted to applique, in this case it was the lion.
2. I scanned the image into my computer and resized it to the size I wanted that would be big enough for the pillow.
3. I printed off the resized lion image and set it aside.
4. For my pillow cover I went on ahead and cut the three pieces of fabric I needed to make it (I made an envelope cover instead of one that zips on).  My pieces were 13"x16" (for the front piece) and then two back pieces, 13"x8" and 13"x14".  (for a step-by-step guide to making an envelope pillow cover, click here).
5. I took the 2 smaller back pieces of the pillow (13"x8 piece and the 13"x14" piece) and I ironed down a half inch down the 13" side of both pieces.  I then sewed it down to make a finished edge.

6. I used my printed out lion to decide how big of a piece of muslin I wanted to put as the background to my applique, in this case it was 9"x12".
7 I took my rectangle piece of muslin and ironed down about a 1/4" seam all the way around.  
8. I pinned my rectangular muslin piece to the center of the 13"x16" piece of fabric that would be the front of my pillow.  

9. I sewed the muslin piece onto the front of the pillow, being sure that I sewed close to the edges to catch the folded part underneath.

getting to the applique....
10. I took my fabric and figured out what pieces of the lion would be what colors (i.e. the body and face were yellow, the tail and mane were orange, etc).  I then ironed on the interfacing to the back of the colored fabric I would be using.
11.  I took my computer print-out of the lion and began to cut each piece - going off of color - (i.e. I cut out the body and worked with it; then I cut out the circle around the mane, then I cut out the mane, etc) and then proceeded to trace and cut it out of the coordinating fabric (with interfacing already ironed on).

12. As i finished one part of the lion, I cut out another part and continued to use that as a pattern to cut out the pieces from the coordinating color fabric for the whole lion design.


13.  I laid my cut out fabric out on the muslin and arranged it to look like the lion.  I then ironed it to the center of the muslin rectangle.

14.  Using floss and a needle, I hand-stitched a simple stitch all the way around the perimeter of each piece of fabric that made up the lion's body.


it all comes together...


15.  After the applique was hand-stitched, I took my ric-rac and pinned it all the way around the perimeter of the piece of fabric that would make up the front of my pillow, on the right side of the fabric.  I made sure that the ric-rac was "hanging off" the edge of the fabric.

16. I sewed on the ric-rac.
17. I then proceeded to take my two smaller back of the pillow pieces and pinned them, right sides facing in, to the front piece of the pillow.
18. After pinning, I sewed all the pieces together, following the sewn line that I had just made when sewing on my ric-rac.

19. I turned my pillow right side out and fell in love with it right away!


I couldn't be happier with the result and I can't wait to see this pillow in action as it livens up the baby's room!  Pillows are a wonderful way to liven up any room, and an applique pillow is great for a beginning sewer.  If you have any questions when following this tutorial, don't hesitate to ask; I'd LOVE to help you!
Whenever I get a chance and a break from life (hahahaha!) I'm going to do this exact same project, only with the giraffe instead.  Come and check out my blog and see how it turns out!  

Tuesday, July 12, 2011

Magnificent Mondays: Magnificent Blogs 66


Have you guys ever had the privilege of finding yourself over at Taylor Made?  Talk about great projects, great tutorials and a great blog over all!  You'll definitely need to head on over to Taylor's place and see what she can have you muster up!

For instance, check out this beyond adorable patchwork clock!  Talk about a great addition to your craft room!

Before I got married, my BFF, Doni gave me a lingerie bag as a gift.  I use it all the time to separate my clean and dirty unmentionables whenever we're on trips.  This tutorial looks simple to follow and would make for a great gift!

Speaking of Donielle, this clutch looks just like something she would love!

And last but not least, I am loving this peacock painting...talk about beautiful!

Now it's your turn.  Head on over to Taylor Made and see for yourself what a great blog it is!

Happy Blogging!


Monday, July 4, 2011

Magnificent Mondays: Magnificent Blogs 65

Holy moly!  Have you guys checked out Homemade by Jill?  If you have never found yourself hanging out at Jill's blog, you should high-tail your little beeeeee-hind over there!
This girl has got it going on!  She has tons of ideas and tutorials on things to make for gifts, for kids, for showers, for the home...I could keep going!
Let's just cut to the chase...

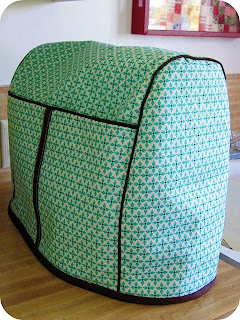
Do you have a Kitchenaid stand mixer?  If so, then you'd probably be interested in Jill's tutorial on how to make a cover for the said mixer:

If you're anything like me, you're always looking for inspirations to decorate your home that is friendly to your purse strings....look no further!  Jill will show you a tissue-paper art tutorial that turned out absolutely splendid:

Not only is Jill crafty, but she's also a crafty mom ;).  I love this bird mobile she made to hang above her baby's bed:

I love hand making gifts, especially Christmas gifts.  I'm definitely going to be trying my hand at these gourmet looking hot cocoa tins as gifts for this upcoming Christmas:

And because I couldn't stop at featuring 4 great projects, I love this vinyl art that Jill created using her Silhouette:

I could keep showcasing projects, but then I would just be recreating her blog.  To save you and me time, just head on over to Homemade by Jill and check out the greatness that is her blog and then let me know what you love about it!

Happy Blogging!


Monday, June 27, 2011

Magnificent Mondays: Magnificent Blogs 64

It's been a whole week and I've been MIA...SORRY!  I have been busy with grad-school and I split town on Wednesday (I'll share my adventures with you in a bit); the good news is that it's actually Monday and I'm getting the Magnificent Blog to you on the right day (who cares if it's towards the end of the day).
Onward...
If you've found yourself eyeing that Goodwill dresser or the yardsale coffee table, then A Few Good Pieces is a blog that's right up your alley!  My mom and dad are playing around with the idea of getting new dining room furniture and potentially handing their current set to me.  I'm super giddy at the idea of saving money by not having to purchase a set for myself and also at the potential that this furniture has!  With that on my brain, I found myself "oooooooo-ing" and "ahhhhhh-ing" over at A Few Good Pieces.

Like, for real, check out this dresser!  I'm loving it!

I've played around with this idea of painting the bottom of the table white (as well as the chairs) and staining the top of it dark.  Thoughts?

I'm loving the pop of color that this dresser brings and the ornate detail of it...so fun!

I love the wood detail on the top of this first coffee table!

Get your booty on over to A Few Good Pieces and be inspired...your husband might not appreciate the spurring of new thrift store trips that this blog will cause :)

Happy Blogging!

Tuesday, June 21, 2011

Magnificent Mondays: Magnificent Blogs 63

For the sake of this post, let's all pretend that it's Monday....ready?


I've been following a bowl full of Lemons for quite sometime now and I absolutely love it!  It's full of great projects, inspirational decorations and practical tips on organization.  A little jack-of-all-trades kind of blog :).

I really like this version of the PB inspired moss letters for the kitchen!

Looking for a good mantle decoration on the cheap?  What about these beautiful DIY topiaries?

These PB inspired numbered pillows turned out fabulous!

I love her redecorated vintage kitchen - so pretty!

Okay, your turn!  Go check out a bowl full of Lemons and get going on your next crafty kick!

Happy Blogging!
{p.s. it's really Tuesday - isn't it fun to blink away a Monday?!?!}

Tuesday, June 14, 2011

Magnificent Mondays: Magnificent Blogs 62


Melissa over at The Polkadot Chair is a crafter after my own heart!  Not only does she offer great ideas, tutorials and inspirations, but she also resides in my Old Kentucky Home - that's enough to make her blog visit-able! ;)

I'm loving this quilted table runner.  For those of you out there like myself who are trying to pump themselves up to quilt, this looks like a good place to try your hand at it!

I'm loving this photo wall - especially with all those promotions that the canvas people have!

This subway tile job is to die for!  I'm loving the timeless shape of the tiles, the glassy finish and the olive color.  I'm sold!

If I thought I liked her subway tile, I was really smitten when I saw her fireplace tile work!  This looks so good!

Don't waste a second - go check out The Polkadot Chair and see why I love it so much!

Happy Blogging!

Monday, June 6, 2011

Magnificent Mondays: Magnificent Blogs 61


Kim over at Savvy Southern Style has just that - some savvy southern style!  What I really love about her blog is how she has decorated her home in this style without breaking the bank.  Kim offers wonderful inspiration to decorate beautifully on a budget.  Go Kim, go!

I fell in love with Kim's blog as soon as I stumbled upon her Sun Room.  I love all the yellows, reds and different elements that she has going on in this wonderful room.  If I knew where she lived, I'd come over and just hang out in her sun room...okay, that's creepy, I probably wouldn't (but I would) :)

I'm also loving all the different fabrics Kim chose when she was "styling" her sister's porch.

The repurposed frames look absolutely stunning with the new life that was given to them.  Makes me want to go to the thrift store right now and snag me some...too bad they're not opened at the moment!

Oh, and check out this awesome sideboard that now looks amazing thanks to some blue paint and Kim's touch!

Waste no time and head on over to Savvy Southern Style to grab some southern inspiration for your home!

Happy Blogging!

Tuesday, May 24, 2011

Copycat: Quartrefoil Tray

A couple of months ago, Stephen and I were walking back to our apartment when we stumbled upon this perfectly good wooden tray that someone had tossed out with their trash (don't worry - it wasn't IN their trash can, just hanging out next to it).  Stephen looked at me with a silly little grin, knowing exactly what was going through my mind.  That's right - I wanted it.  Who wouldn't?  It was in good shape and was FREE - score and SCORE!  We picked it up, carried it home and tucked it away in a closet until inspiration came to do something with it.

Fast forward.

Last week I thought about the tray and I remembered that we were heading to Kentucky for the weekend.  Because Chicago doesn't sell spray paint, I knew I was going to have to snag some outside of the city.  I picked up the spray paint and returned to Chicago knowing that I was going to tackle that tray once and for all....

...and then I stumbled upon this Quatrefoil Trey at Red Heads Craft More Fun.  As soon as I saw Courtney's tray, I KNEW I wanted to be a copycat.  That's one of my most favorite things about reading blogs!  I'm constantly being inspired by all the creativity surrounding me.  Thanks for the inspiration, Courtney!

What I used:
*A wooden tray
*Americana Acrylic Craft Paint in "Butter"
*Krylon Indoor/Outdoor Spray Paint in "Ivy Leaf"
*spray paint sprayer nozzler (yes, that is the technical name of it :-P)
*sandpaper
*the quatrefoil stencil
*pencil
*pair of scissors.

What I did:
*I gave my wooden tray a good rub down with sandpaper - keep with me people, it's not good for your minds to wander there!
*I then went to town on it with my spray paint.  That sucker ended up soaking up the entire can of spray paint - geeze-oh-pete!


*After about 100 layers of spray paint (okay, not really, more like 5-6) I went into the apartment and printed off the quatrefoil stencil and got to work cutting it out.
*Once I had cut it out, and the spray paint had time to dry, I laid the stencil down on my tray and began tracing the design on there.  I continued to trace the design, lining it up with what I had already traced, until the entire tray was covered.
*I took my Americana Butter and patiently painted and filled in the quatrefoil design on my tray.  I let that dry and then came back to it to add a second coat.
*Once all paint had dried, I came back to the tray and sanded the pants off it to give it a good, aged look.


Let me tell you - I LOVE IT!  I didn't realize how much I was going to like it until I finished and saw it hanging out on my coffee table.  I love the color that it brings up onto the table and I absolutely LOVE the contrast between the green and the butter (thanks to my friend Jenn who pointed me in that direction!)!  Better yet, I really love the price tag of this project!  In all, I spent about $5.  The tray was free (sorry, I'm not trying to rub it in...), the spray paint was like $3.87 and the Americana paint was like $1.20.


All thanks to Courtney, the redhead who has more fun crafting than myself ;) - without her post, my tray would've just been green...I'm soooo glad I saw her tray first!


I'm linking up to these parties:
(T) Today's Creative Blog; Sugar Bee Crafts; New Nostalgia; Coastal Charm; Hope Studios; (W) Trendy Treehouse; Blue Cricket Design; Domestically Speaking; The Thrifty Home; Someday Crafts; Women Who Do It All; Sew Woodsy; Night Owl Crafting; (Th) Gluesticks; Somewhat Simple; The Shabby Chic Cottage; House of Hepworths; Tales from Bloggeritaville; Fireflies and Jellybeans; It's Sew Stinkin Cute; Delightful Order; bouffe e bambini; Organize and Decorate Everything; (F)Chic on a Shoestring Decorating; It's a Hodgepodge Life; It's FUN to Craft!; Fingerprints on the Fridge; The Shabby Nest; Remodelaholic; Simply Designing; Home is Where My Story Begins; (S)Tatertots and Jello; The Creative Crate; A Vision to Remember; Young and Crafty; Along for the Ride; Funky Junk Interiors; Lolly Jane Boutique; (Sun)I Heart Naptime; Under the Table and Dreaming

Monday, May 23, 2011

Magnificent Mondays: Magnificent Blogs 60


My friend, Amanda, is a quilter.  She has made so many beautiful quilts, and in doing so, has inspired me to (think about) make one of my own!  When I stumbled upon this blog/website, I knew I had to share it because it really reinforced that desire.  I know there are a lot of you out there who share the desire to create a quilt that could be passed on in your family.  Maybe you're like me and the thought of making a quilt overwhelms you.  I think Moda Bakeshop is just for us - it breaks down the process and really makes the idea of quilting seem like it could happen!  Amanda, I hope you find some great inspiration on here for your next quilt!

Ever get confused when reading quilting terms like "layer cake" or "dessert rolls"?  Don't be fooled - these aren't sugary sweets - this page will give you different tutorials on how to create your own quilt using one of these different types of bundles.

Did you know I love pillows?  I reeeaaaallly like these pillows!

I'm loving this quilt!  I love all the colors and the design of it!

I really, really, really like the geometric design of this quilt...is this the one???

All you quilters (and quilting wanna-bes) unite!  Head on over to Moda Bakeshop and get lost in all the quilting possibilities!  Amanda, I'm super interested in hearing what you think!

Happy Blogging!

Monday, May 16, 2011

Magnificent Mondays: Magnificent Blogs 59

Jess is quite the sewer and she makes me want to sew everything in the world!  She is super inspiring with her great clothes for little girls.  I hope to try my hand at some of her sweet little dresses!  Not only does the blog have wonderful tutorials on sewing clothes, but Craftiness is Not Optional has great tutorials on a bunch of other things as well!

If my sister has a sweet little baby girl, I definitely want to make this dress for her!

Check out this super sweet little dress!  For the love!

Looking for a gift for a sister, mom or best girl friend?  How about this adorable half apron?

I definitely need to follow this tutorial for making a new ironing board cover - mine is the pits!

I LOVE this poinsettia Christmas tree skirt - SO pretty!

Head on over to Craftiness is Not Optional and be inspired to sew!!!

Happy Blogging!


Tuesday, May 10, 2011

Magnificent Mondays: Magnificent Blogs 58

Dwellings by DeVore is a wonderful blog to go to for some design inspirations.  Follow the adventures of a new designer as she puts her gift to the test in her own home and be inspired!  I know I was!!!

Check out her beautiful dining room!  Not only is it gorgeous, but she rehabbed all the furniture and then gave you links at the bottom to see how she did it!  Now that's a girl after my own heart!  I really liked seeing how she decorated on top of her table and other surfaces...I definitely need inspiration when it comes to those places!

I absolutely LOVE her foyer!  I love how she did the stenciling on the back wall as an accent wall!  I also REALLY love her circle monogrammed mirror...and the color brown?!  Be still my heart!

Her guest bedroom is just as beautiful as the ones above...I am a sucker for warm colors (especially brown) but I've found myself really wanting to incorporate a cool blue into my rooms as well.  I really like how she pulls the browns and the blues off with the white furniture.  So. pretty.

Head on over to Dwellings by DeVore for some inspirational face-lift ideas for your home.  I bet you'll find yourself perusing Craigslist right afterwards, just like I did :).

Happy Blogging!

Monday, May 2, 2011

Magnificent Mondays: Magnificent Blogs 57

Not only does Carrie over at Dittle Dattle have an amazing name ;), but she also has an amazing blog!

Check out this AWESOME drum lampshade tutorial that totally transformed this room!

You guys know my obsession with pillows...while it may not be Christmas time, I still can't wait to make this pillow!

And since I'm in the Christmas spirit now, I'm loving this fresh cider monogramed wreath!

Check out her amazing replica of the Ballard Ticket Plaque!

Don't waste your time listening to me ramble!  Head on over to Dittle Dattle and check out all of the inspirations that Carrie has to offer!

Happy Blogging!


Tuesday, April 26, 2011

Magnificent Mondays: Magnificent Blogs 56

Apologies for this Magnificent Mondays blog coming to you on Tuesday - I'm finishing up my LAST week of grad classes until my summer session starts in June.  Needless to say, I'm a bit busy, but I've been wanting to showcase this blog for a few weeks now so here 'ya go!

Ginny, over at Cooking With Chopin, Living with Elmo, is a stay-at-home-mom who could've fooled me!  Her love for cooking had me convinced that she was a part of the culinary world and I was so impressed with her when I learned that it was just a dear hobby to her!  She's got some amazing recipes over at her blog with wonderful pictures to go with them.  

Since I've moved to Chicago everyone is big on breakfasts and brunches.  Stephen and I really enjoy having friends come over on a Saturday morning to enjoy some yummy breakfast food.  When I saw this recipe for breakfast quiche, I found myself drooling all over the keyboard!

I am so intrigued with this recipe for Lemon Pound Cake with Lavender-Lemon Icing...I SO badly want to make it so I can try it for myself!

Be still my heart!  These Ricotta Stuffed Jumbo Pasta Shells just look utterly amazing!

And one last one for kicks...I love me a good casserole....especially when it involves cornbread and cheese!  Come to Mama, Beef, Bean and Cheese Casserole!

Head on over to Cooking with Chopin, Living with Elmo and check out all of Ginny's drool-inducing recipes and great kitchen tips!

Happy Blogging!

Monday, April 18, 2011

Magnificent Mondays: Magnificent Blogs 55


Whenever it is time for a celebration (babies, weddings, etc) I often find myself wishing that I had the uncanny ability to decorate cookies and such like Sweet Sugar Belle does!  This woman is out of control!  Her cookies are meticulously decorated and look just like the real thing!  Not only do I really love all the pictures of her cookies that are such an inspiration, but the fact that she also includes tips and tricks to show you how to decorate your own baker's dozen.

Here are a few of my favorite...

I love how she took these Easter cookies and used them as cupcake toppers!

These Spring bird nest cookies are TOO cute!

Seriously?!  Look at how perfect all of these cookie collections are!

2 things my husband loves: Peeps (the candy) and sugar cookies.  I think that one day I'll try to make him these - a nice hybrid of the two!

Get your little blogging booties over to Sweet Sugar Belle's and be inspired!  Let me know what cookies you love...if you can narrow it down to just a few :)

Happy Blogging!


Monday, April 11, 2011

Magnificent Mondays: Magnificent Blogs 54

Okay, so I realize that I've been a bit M.I.A...I had a huge comprehensive exam for grad school (if you'd like to be praying for the results of that, I'd greatly appreciate it!) and then school work has been somewhat all consuming!  But, I'm back and hopefully it'll be with a vengeance!  Onto a magnificent blog...

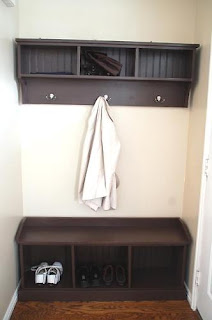
If you've never found yourself oooing and awing over at Ana White, then you best be gettin' your booty over there!  Ana is a stay-at-home-mom turned carpenter who provides wonderful pdf instructions on how to build any and every piece of furniture you could ever imagine!  I've already signed my opposite of handyman husband up to make a few pieces for our future home.  I usually don't include pictures but I love it so much that I'm going to share the entire picture with you!

Project #1 for my future "mud room":

Project #2 for my future office/guestroom:

Project #3 for my future daughter:

Project #4 for my future sewing room:

I could seriously keep going, but I would basically be sharing ALL of Ana's furniture plans with you!  Go check out Ana White and let me know which piece of furniture you've got your heart set on!