Showing posts with label Baking. Show all posts

Friday, June 21, 2013

Patriotic Treats with a Side of Summer Accountability

It all started when I was pinning (which I do quite a lot now that school is out and when I'm successfully putting off doing something) away on Pinterest and I came across this pin...

Stephen and I were going to enjoy a cook-out at his parents house for Memorial Day Weekend and I decided that I was going to make one of Stephen's most favorite treats: Cake Balls.  Have you ever made cake balls?  Have you ever tried them?  If you've never tried them, you need to get your hands on at least one and taste the goodness for yourself - they are truly amazing.  If you've never made them, let me caution you: they are very time consuming.  Back in February I made the mistake of asking Stephen what he wanted for his birthday.  He insisted that he wanted nothing and I insisted that it was HIS birthday, I would make him ANYTHING he wanted (did you read my post from Monday to see how busy I was during this time?).  He decided that he wanted cake balls.  I'm pretty sure a part of me died a little inside when he said that...of all the things he wanted, he chose the most time consuming dessert possible.  However, I did tell him that I would make anything he wanted (dang it!) and so cake balls it was....

Fast forward to May - school was about to be out and summer was on the verge of happening - I was feeling adventurous!  I was going to make cake balls...not just any cake balls, Patriotic Cake Balls!!!  {cue the dramatic, excited music}

These were my inspiration from this website:


1st step was to make the cake balls.  If you've never made them before, here is the recipe (there are a million if you google "how to make cake balls" or "cake pops" and they're all about the same).  I used a half a tub of frosting to make mine.  I went with white cake (mine and Stephen's fav) and white icing.  After I made the cake balls, I arranged them in my 13x9 metal cake pan to get an idea of how many of my balls {insert inappropriate middle school boy jokes here} needed to be red, white and blue.


Once I figured out how many balls needed to be what color, I got to work and did each color separately.  I used the Wilton colored candies from JoAnns (or any craft store - even Wal-Mart carries them) to coat my cake balls.  I had lots of trays of different colored cake balls sitting around my kitchen.  Talk about needing self control to just hang around them without eating them!  If you do make cake balls, be sure you make lots of extras so you can just pop them in your mouth while you're working!


Unfortunately I did not do my math correctly and I didn't have the right amount of white cake balls.  What's scary about this is that I teach 4th grade math....this was a perfect example of math in real life (because everyone makes cake balls, right?) and yet I failed at it.  Stink.


The good news is that even though I was short on the white balls, they still tasted great!  It's a good thing that these desserts take a while to make, otherwise, I'm pretty sure I would make them entirely too often and my thighs would pay the price for this bad addiction!

For this upcoming 4th of July, I'm thinking about making this dessert from Betty Crocker:

I'm also thinking about making these to hang under the pergola by our family room window:


Now onto the side of Summer Accountability.  I know you probably don't care about how I'm spending my summer days and please know that this part of the post is entirely for me.  Last summer I found myself getting overwhelmed by all the different things I wanted to accomplish during the summer time. This overwhelming feeling kept me from accomplishing much of anything.  As a way to try and ward off laziness, I've decided that I'm going to blog about my daily activities during the summer.  Maybe it'll keep me from getting sucked into Bravo's Real House Wives Marathon because I'm ashamed to tell all of blogland that this is how I chose to spend my day!  So here it is, my daily what dos:

Monday: walked Princeton in the morning, changed the sheets on the bed and washed them, put sheets back on the guest bed, did the laundry and put it up, blogged, did my Bible study, worked on a small art project that I had been putting off, touched up trim in the entry way, went to Bible Study.
Tuesday: walked Princeton in the morning, put a first coat of paint on the inside of the front door, put up the last basket of laundry, went to dinner with my parents, took Princeton on an evening walk.
Wednesday: walked Princeton in the morning, put a second coat of paint on the front door, cleaned up in the basement, my friend Julie came over and we hung out most of the afternoon, took Princeton on an evening walk.
Thursday: cleaned up the paint mess, went to the grocery store, worked out in the backyard for 3 hours, vacuumed and tidied up, made dinner and Stephen's parents came for dinner, took Princeton on an evening walk.
Friday: filled the dishwasher, did the rest of the dishes, worked in the vegetable garden, painted the first coat on our bedroom closet, emptied the dishwasher, blogged.....


Do you think I'm crazy yet?  Feel free to skim past these random lists of my uneventful days...I'll be honest - I did get sucked into a few episodes of Real House Wives of the OC...it's like a train wreck and I can't turn away.  These women are SO mean to each other.  It's hard to wrap my mind around the fact that they exist, they're adults and I'm aiding their richness by being sucked into their drama.  Ugh. Do you have any "guilty" tv pleasures?  I'm not gonna lie....I also get sucked into Real House Wives of NJ....okay, enough confessions!

I'm linking up with these parties:


Thursday, February 9, 2012

Craving Pizza?

Last month, Stephen and I had Stephen's sister and her husband over for dinner and a game of Settlers of Cataan.  In an effort to please all people involved, and to spice things up, I decided that we would all be making our own personal panned pizzas.  I had a great "Chicago-Style Pepperoni Pan Pizza" recipe from The Cook's Country Cookbook that I had made back in the Spring for my Chicago Small Group  that turned out to be quite a hit.  The only problem with it was that the pizzas it made were only 9" (and they weren't intended to be personal pan pizzas) - not that big.  The more I thought about it, the better that was - with a smaller pizza, we could all make our own and have a pizza exactly the way we wanted it!  Here are pictures to show the progress; recipe to follow:

My pizza toppings: sauce (recipe to follow); mozzarella; mushrooms; green pepper; onion; Italian sausage; pepperoni

The dough before it started to rise

Cutting up the toppings to prepare for the dressing of the pizzas

Dividing the dough among 4 8" cake pans - be sure you rub them down with olive oil first
Once you've divided the dough, push and pull it to cover the entire bottom of the cake pan

Assign everyone their own pan and allow them to make their pizzas to their liking and then bake in the oven

Enjoy! - YUM!!!

Ingredients for dough:
(To make an 8" pizza for 4 people, I doubled these recipes)
*1/2C olive oil *3/4C plus 2T skim milk heated to 110 degrees *2t sugar *2 1/3C all-purpose flour, plus extra for the work surface *1 envelope rapid-rise or instant yeast *1/2t salt

What to do:
*Adjust an oven rack to the lowest position and heat the oven to 200 degrees.  When it reaches 200 degrees, turn it off. Lightly grease a large bowl and coat two 9-in cake pans with 3T of the oil (I used 8").
*Mix the milk, sugar, and remaining 2t oil in a measuring cup.
*Mix the floud, yeast, and salt using a standing mixer and a dough hook. Turn the machine to low and slowly add the milk mixture. After the dough comes together, increase the speed to medium-low and mix until the dough is shiny and smooth, about 5 minutes.
*Turn the dough onto a lightly floured work surface, shape into a ball, and place in the greased bowl. Cover with plastic wrap and place in the warm oven until doubled in size (30 minutes).
*Transfer the dough to a lightly floured work surface, divide in half, and roll each half into a ball.  Take 1 ball of dough at a time and spread it across the bottom of your cake pan.  Cover with plastic wrap and set in a warm spot (not the oven) until puffy and slightly risen, about 20 minutes (oops!  I forgot to do this - still tasty!).  Preheat the oven to 400 degrees.
*When the dough is ready, cover it with your favorite toppings and then put it in the oven for 20 minutes, or until the cheese is melted and the dough is browning around the edges.
*Enjoy!!!

Simple Pizza Sauce
Ingredients:
*1T olive oil *2 garlic cloves, minced *1 (28oz) can crushed tomatoes *Salt and pepper

What to do:
Cook the oil and garlic in a medium saucepan over low heat until fragrant (2 minutes). Add the tomatoes, increase the heat to medium and cook until slightly thickened, 10-15 minutes.  Season with salt and pepper.  


I promise, this is sure to please!  Who doesn't like to be able to make their own, tasty personal pan pizza?!  It sent me right back to elementary school and collecting book-its to take to Pizza-Hut!  I hope you love it as much as we do!

Tuesday, June 28, 2011

Here's to the Red, White and Blue!

I love summertime.  I love holidays.  I love desserts.  That is what inspired this 4th of July dessert post!  I look forward to the day when Stephen and I have a nice backyard where we can celebrate this great holiday by being outside and hosting friends and family at our place.  When that day comes, maybe I'll make one of these scrumptious desserts!


Super simple!  I remember being a little girl and seeing this on the front cover of my mom's Women's Day and instantly thinking it was amazing!

You could also do this with the regular old dessert pizza on sugar cookie crust


Evidently I love trifles! :)


Easy Peasy!


Which one do you think looks the best to try?  I can only make one and I obviously need your help deciding!


Wednesday, May 25, 2011

Bon Appetit: Mini Pumpkin Cheesecakes

The other day, I was using my cornstarch (to make this yummy strawberry pie) when I snagged this great recipe from the container.  I was so intrigued by the simplicity of this and the possibility of having fall in my mouth, that I decided to give it a try for my small group.  Verdict? These mini pumpkin cheesecakes are so incredibly good and so incredibly easy, that I know this won't be the last time I make them!


Here's what you need:

*18 paper baking cups (2 1/2 inch)
*18 gingersnap cookies
*12 ounces cream cheese, softened
*3/4 cup sugar
*1 Tablespoon corn starch
*1 teaspoon pumpkin pie spice
*2 eggs
*1 cup canned pumpkin
*1/3 cup corn syrup (light or dark)

Here's what you do:
*Line muffin pans with 18 paper baking cups. Place 1 gingersnap in each.

*Beat cream cheese, sugar, corn starch and pumpkin pie spice with an electric mixer.  Add eggs and mix well.  Add pumpkin and syrup; beat 1 minute.

*Pour filling into paper baking cups, dividing evenly.  Bake in a preheated 325 degree oven for 30-35 minutes, until just set.
*Chill for 1 hour.  Garnish as desired (I used slivered almonds and chocolate chunks)

*Makes 18 mini cheesecakes


Thanks Argo Cornstarch for changing my life! :)

Here's a handy dandy little recipe card I made for you!  Just click, save and print!  (Thanks to Mel over at The Larson Lingo for this great idea!)


Monday, April 18, 2011

Magnificent Mondays: Magnificent Blogs 55


Whenever it is time for a celebration (babies, weddings, etc) I often find myself wishing that I had the uncanny ability to decorate cookies and such like Sweet Sugar Belle does!  This woman is out of control!  Her cookies are meticulously decorated and look just like the real thing!  Not only do I really love all the pictures of her cookies that are such an inspiration, but the fact that she also includes tips and tricks to show you how to decorate your own baker's dozen.

Here are a few of my favorite...

I love how she took these Easter cookies and used them as cupcake toppers!

These Spring bird nest cookies are TOO cute!

Seriously?!  Look at how perfect all of these cookie collections are!

2 things my husband loves: Peeps (the candy) and sugar cookies.  I think that one day I'll try to make him these - a nice hybrid of the two!

Get your little blogging booties over to Sweet Sugar Belle's and be inspired!  Let me know what cookies you love...if you can narrow it down to just a few :)

Happy Blogging!


Thursday, March 10, 2011

Bon Appetit: Not Yo Mama's Banana Pudding

Banana Pudding lovers, UNITE!  Let start this post off by saying a couple of things.  1) I am by no means thinking that discovered this recipe and you've never heard of it (I'm sure many of you have) 2) I've been making this recipe for years and it gets me every time (if I were left alone in a room with this, I would for sure eat the whole 13x9 pan up) and 3) I have a food crush on Paula Deen.  Okay, moving on.  If you've never made this recipe and you like Banana Pudding, you MUST (I repeat: MUST) make this recipe today!
Here's what you need:


  • 2 bags Pepperidge Farm Chessmen cookies
  • 6 to 8 bananas, sliced
  • 2 cups milk
  • 1 (5-ounce) box instant French vanilla pudding
  • 1 (8-ounce) package cream cheese, softened
  • 1 (14-ounce) can sweetened condensed milk
  • 1 (12-ounce) container frozen whipped topping thawed, or equal amount sweetened whipped cream
***I'll be the first to tell you that Pepperidge Farm Chessmen cookies are more expensive than Vanilla Wafers.  I'll also be the first to tell you that these cookies really make this recipe amazing.  Don't get stingy on Paula - just buy the cookies!

Here's what you do:


Line the bottom of a 13 by 9 by 2-inch dish with 1 bag of cookies and layer bananas on top.
(I was making this for mine and Stephen's small group so I improvised and used 2 9" pie pans instead of 1 13x9 and it worked wonderfully!)

In a bowl, combine the milk and pudding mix and blend well using a handheld electric mixer. Using another bowl, combine the cream cheese and condensed milk together and mix until smooth. Fold the whipped topping into the cream cheese mixture. Add the cream cheese mixture to the pudding mixture and stir until well blended. Pour the mixture over the cookies and bananas and cover with the remaining cookies. Refrigerate until ready to serve.

Don't mind that butter sitting there - that was for something else :)


Here's a side view of the goodness that is Paula Deen's Not Yo Mama's Banana Pudding
And here's a photo from the Food Network's Site:


Let me tell you, this stuff is goooooooood!  
This recipe was hijacked from here :)


Thursday, February 24, 2011

Bon Appetit: Chocolate Chip-Me

A couple of weeks ago, I found some chocolate chips under the microwave that I had bought awhile back. I was preparing for the arrival of my friends Ryan and Carly so I decided to use up those chips and make some yummy chocolate chip cookies.  At the time, I was on the phone with my bestest friend, Doni, who just so happens to bake as a hobby.  We were both talking about how much of a bummer it is that homemade chocolate chip cookies never taste or look as good as the break and bake cookies.  She told me to look up the Mrs. Field's recipe and maybe that would help.  I did that, and I was so excited to see some things on the ingredients list that I had never used before (a 1/2 cup of oat meal finely chopped up into a grain-ish substance).  I just knew that this recipe with different ingredients would make some killer cookies.  Unfortunately, I was wrong.  While the recipe was good, it still wasn't what I was looking for.  Although the crowd (Ryan, Carly and Stephen) enjoyed my efforts, I was somewhat baffled (not too baffled - this is just a cookie recipe we're talking about here).  How do I get the ooey-gooey perfection that is the break and bake?  How do they do it?!
I was sharing my frustration with Ryan and Carly while (appropriately) stuffing my face with the cookies.  And that's when Carly mentioned a to-die-for recipe involving (prepare yourself for a little bit of a cringe) butter AND shortening as well as vanilla pudding.  As she continued talking, I just knew I needed to get my grubby little paws on it.  That's where my good friend, Google stepped in.  I'm a big googler - I google everything.  As I clicked upon the link that held the "secret" to the most amazing chocolate chip cookie recipe, a light from heaven shone down and a choir of archangels sang in the background - ahem!  Just cookies.  But, needless to say that after making this recipe once, it's a recipe that I plan on using over and over and over and over and over....
and over again :)  Without further ado, I'd like to introduce you to Mr. Chocolate {I'll Be Your Chip} Cookie.  (yes, yes, I made that name up because evidently I have nothing better to do)


Ingredients:
*2 1/4 cups flour
*1 teaspoon baking soda
*3/4 cup packed brown sugar
*1/2 cup butter, softened
*1/2 cup shortening
*1/4 cup sugar
*1 (4 ounce) package instant vanilla pudding
*1 teaspoon vanilla extract
*1/8 teaspoon almond extract {I didn't have it and Aldi didn't sell it so I didn't use it}
*2 eggs, beaten
*2 cups chocolate chips


Directions:
*Preheat oven 350 degrees.
*Combine flour and baking soda.
*In a large bowl beat brown sugar, sugar, butter, shortening, pudding mix, vanilla, and almond extract.
*Mix until well blended.
*Add eggs and mix well.
*Beat in the flour mixture.
*Stir in chocolate chips.
*Drop by rounded teaspoonful and bake 10-12 minutes.
*Be prepared to give out the recipe


Somehow, in all of my excitement, I forgot to take a picture of the final product. Here is a picture from the website where I found the recipe - my cookies looked just as good as these:

So pretty, so perfect, so gooood!

Seriously - go get baking right now!

This recipe and the picture were borrowed from Food.com


Friday, December 3, 2010

Bon Appetit: Thanksgiving Dessert

My Aunt Deloris is one phenomenal cook!  She knows her way around her kitchen (or yours for that matter) like the back of her hand.  She's been knocking the socks off my taste buds for my entire life!  This year, I felt like maybe I should try to help her out and contribute to the dessert portion of the menu (remember who I'm married to - Stephen a.k.a. "Granulated Sugar MaGee").  As soon as I saw the recipe for this amazing pumpkin cake, I was sold!

Due to travel purposes I made the actual cake part of the dessert on Wednesday evening before we split town for the holiday.  I then put the whole thing together on Thursday afternoon when we were ready to dive into it.  Here she is, in all her glory:


If you're looking for a good, easy and DELICIOUS dessert recipe, I recommend this one!  Yum! Yum! Yum!

Monday, November 22, 2010

Magnificent Mondays: Magnificent Blogs 40


Glory has a plethora of great recipes and decorating ideas to make your next special occasion (or just any meal) delightful!

I absolutely love these and can't wait to make them in May for my moms on Mother's Day!

We all know how I feel about fall so I was thrilled when I saw that Glory had included this post as a place where I could find lots of yummy fall treats.

If you're going to be planning a baby shower anytime soon, these would make a great addition to everything else

Head on over to Glorious Treats and see all the amazing baking recipes that Glory has to offer!  Let me know which treats you love the most :).
Happy Blogging!

Tuesday, October 26, 2010

DIY Wedding Fun - Part 7

Yummy Desserts/Favors
The spring before our wedding, I had attended the wedding of a friend who had heart shaped, monogrammed cookies as favors.  I loved the idea of them but didn't love the idea of how costly this would probably be.  I quickly learned that their mom's had gotten together and made the cookies super cheaper than they would've paid for them had they bought them from a bakery.  I was ALL about this idea, although I know I stressed out my mother-in-law and my mom with this courageous effort!  
My mom got to work making the sugar cookie dough a few weeks out and freezing it until we were ready to work with it.  We got together (my mom, mother-in-law, sister, sister-in-law and best friend) a week before the wedding and baked the cookies in the desired leaf shapes (oak and maple).  This process took a good 2-3 days to completely roll, cut and bake all the cookies that we would need.  We then got together and iced the cookies using royal icing from a recipe I found online.  This process took a good 1-2 days as we had an assembly line going of piping and flooding and moving the cookies where they could dry.  Once this was all finished, I piped the "C" on each individual cookie and bagged them the Thursday before the wedding.  While I didn't get to taste any of the official cookies, I heard they were quite yummy!
Here is the "C" that I got from The Knot as our cake topper.  The only problem that I had with it was that it was silver and I really wanted it to be a soft shade of gold to match with our warm, natural colors in the wedding.  So, I spray painted it - simple enough!  
My husband has QUITE the sweet tooth...to him, sugar is in the bottom portion of his nutritious pyramid!  Because of this, we incorporated all the things that he loves into the wedding: the sugar cookies, the cake with 3 different flavors (Italian Wedding, Strawberry and White Chocolate) as well as homemade pumpkin pies (made by my incredibly sweet friend, Anessa!), candy corn AND a groom's cake (Cinnamon Swirl with EXTRA cinnamon per the groom's request).  Needless to say, our guests fell into a pile of granulated sugar as they left our reception!
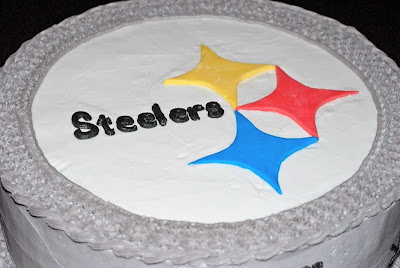
The Roman Numerals on the side of the cake are all the different Super Bowls that the Steelers have won.  My husband's cousin, a devout Cleveland Browns, fan did not really care for this cake :).
The Groom's cake was a huge success with Stephen and his family!  Stephen was born a Steeler's fan as his whole family lives in Pittsburgh (and this is where he was born).  I was so happy to incorporate things that Stephen loves into our big day!