Showing posts with label Gifts. Show all posts

Thursday, November 1, 2012

Crayon Wreath

The teacher inside of me was screaming to try this when I first saw the idea pinned on Pinterest:
My only problem with it was there was no tutorial.  No worries for this gal, I just decided to make my own up.  If you'd like to make a cute classroom wreath for your child's teacher for Christmas or Teacher Appreciation week (in May), here is the tutorial to make one just like the Hobby Lobby one!

Here are the supplies all from Hobby Lobby (except crayons):
-2 scrapbook pages - 1 with the alphabet and one light yellow
-Wide red ribbon
-3 wooden letters: an m, r, and s
-A bag of alphabet letters
-3 bags of miniature, colored clothes pins
-a bag of small, flat pieces of wood
-6 boxes of Crayola Crayons (got them for $0.50 at the beginning of the school year)
-1 10" embroidery hoop and 1 12" embroidery hoop (these came from my mama so they were free)

Step 1: Place your embroidery hoops inside one another on a flat surface

Step 2: Hot glue crayons to both embroidery hoops all the way around, leaving a small gap between each one.

Step 3: After all crayons are glued on the first layer, go through and add a second layer to hide gaps between each crayon. Do this all the way around the wreath.

Step 4: With all clothespins facing one direction, glue them around the perimeter of the wreath.

Step 5: Glue another row of clothespins next to the first row of clothespins going in the opposite direction (no picture - sorry!)

Step 6: Create the ribbon for the top of your wreath by cutting strips of your alphabet paper around the tops and bottoms of the letters.  You want these strips to be slightly narrower than the width of your red ribbon.  Take spray adhesive (I used Elmer's) and glue the alphabet strips to your red ribbon.  Then, using the layered strips you just glued together, cut strips out of your yellow paper wider than the ribbon.  Use spray adhesive to glue all layers together. You will make 2 strips, the width of your alphabet and yellow paper.

 
Step 7: Form your bow.  Take one of your strips and create a flattened circle out of it (lightly fold both sides down so that they overlap in the back) and hold it against the 2nd strip you made.  Wrap a piece of red ribbon around it.  Using a staple gun (and a pad of paper underneath it), staple your bow together in the middle.  Glue your letter block to the middle (I chose "K" for my first name).

Step 8: Paint your wood.  I wanted to make my little wood plaque look like a chalkboard. Using painter's tape, I made an edge to my board by painting the inside black and the outside red.  After it all dried, I wrote with a metallic Sharpie my last name on the chalkboard.  I painted my letters that spelled out "mrs." a pale yellow and put red, green and blue polka dots on them using the tip of my paintbrush.  Then, I glued the "mrs" to the top of my chalkboard.  Lastly, I assembled everything onto my wreath.  I took floral wire and wrapped it around the top of my embroidery hoop in the back to use as a hook and hung it on the inside of my classroom door.


I hope this tutorial helps and that you're able to use it to make the day of a teacher!  Let me know if you have any questions or if you make one yourself.  I'd love to see it!


Thursday, February 16, 2012

Hand Painted Nursery Signs

I suffer from the I-Can-Make-That Syndrome.  I'm sure a lot of you suffer from the same thing.  It's a blessing and a curse.  I'll be out and about, see something that I really like, see the price tag and think to myself, "I can make that!" It's almost like a challenge against myself (yeah, I know, I'm cool!) to see how well I can make what I've found in the store.  A couple of years ago, I was acquainting myself with Etsy and I found myself drooling over these hand painted nursery signs.  They burned a mental image in my mind and I knew that I had to try my hand at them!  I had a few successes (here and here) with hand painting signs and then a big success with hand painting a sign for my nephew last summer (here).  However, these methods just took too long, and I wanted to try my hand at using my Silhouette to paint.  So, as soon as my dear friend Amanda found out she was pregnant, and my sister-in-law found out she was pregnant, I knew exactly what I wanted to make for them....


Here are my supplies: a $4 board from Hobby Lobby (sanded and wiped down), push pins from my desk drawer, a can of Krylon satin white spray paint, 3 different colors of acrylic paint, and a spool of decorative and coordinating ribbon (wired ribbon works best).
I first stuck the push pins in the bottom of the board so that it is easier to spray paint.

Next, I spray painted it until I was happy with it.

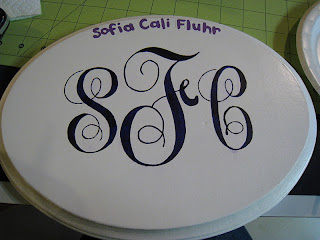
Using my silhouette, I cut out my niece's monogram and attached it to my painted sign to be used as a stencil.  

Then I took my deeper shade of purple and painted the monogram.  I waited for it to dry and then peeled it off.

I then started painting the birth stats (lighter purple).  I made sure I had a small paintbrush (that's the key!) and painted the middle name first (to be sure it was centered).  After I painted her name, I thought that green polka-dots would be great along the edges (I was making this up as I went).

Along the bottom, I added the birth stats.

And then hand painted a flower that was on my sister-in-law's baby shower invitations.  Lastly (with paint) I filled it in with polka-dots.

When I was finished, I spray painted the sign with a spray paint Lacquer by Rust-oleum.  I did this for 2 reasons: to protect that acrylic paint, and also to add shine to the sign.


Pin It
After it dried, I used a staple gun to attach the ribbon to the back of it so that it could be hung on the wall.  

Ta-Da!  I'm done!
It was a wonderful Christmas present for my sweet niece, Sophia!

After I made that one, I got right on the sign for my sweet friend, Amanda and I followed the same steps.  Here are the results:


If you're interested in a great, personalized gift for a new mom, I highly recommend doing this!  If you're not suffering from I-Can-Make-That syndrome and would like to give a new mom this gift, email me!  I'm taking orders!

I'm partying here this week

Monday, January 23, 2012

Salt Dough Ornaments 2011

So last year, I decided that I was going to try my hand at making salt dough ornaments every year to act as a gift tag for Christmas gifts for friends and family.  My 2010 salt dough ornament was a snowman's head and I decided that this year I was going to go for a Christmas tree.  I used a very simple recipe:

2 cups flour
1 cup salt
1 cup water

Directions:
1. Mix salt and flour.
2. Add in half the water, then gradually add the remaining water.
3. Knead until the dough is smooth
4.  Roll out the dough on baking paper or floured counter top
5. Cut out shapes with cookie cutters or design your own.

Bake at 250 for 1-1 1/2 hr Make sure you don't burn them.
Let cool completely & paint.


Here is a progression of my 2011 salt dough ornament:


It was super easy and a lot of fun to do.  I ended up throwing away dough because I just didn't need 9,999 Christmas tree salt dough ornaments!  My goal for my 2012 salt dough ornaments (I know, grow up Kari and stop making goals for your dumb salt dough ornaments) is to take advantage of my summer and get 'em done in July!  Haha.  Isn't that always how it goes...????

Christmas Tree update:
As I was taking ornaments off of it, more and more lights continued to go out.  Are you kidding me?!?  No, no I'm not.  My tree is de-ornamented with 1/2 the lights working in the middle of the room.  Ugh.  Decorating for Christmas is SO much more fun than de-decorating.  Can I get an "Amen!"?

In other news, we made it through another Monday.  Congratulations to you on that great accomplishment!  Every Monday I live through reinforces the idea that my students aren't capable of killing me...yet ;).
May your Tuesday be great, swift and painless!


Tuesday, January 11, 2011

Homemade Holidays 2010, Part 2

Good Morning!  Today is an eaaaaarrrrrly morning for me as I start my first day of spring semester today and I gotta get those hours in on my assistantship so that I can hopefully keep from having to go in to work on Friday...we'll see how that goes!

This Christmas was the year of pillows!  I made pillow galore!  I made pillows for sisters and friends - lots and lots of pillows!  Actually, it was a total of 7 pillows - shew!  Luckily for me, my sweet friend, Amanda came over one day to help me show those pillows who was boss!!!
(please forgive the next few photos as they were taken on my phone...)
I made a lot of these fun pillows that had a flannel front with 3 flannel flowers sewn along the side...


And then you might remember when I blogged about these button monogram pillows that I made for my in-laws.  The pillows were a BIG hit!  Too bad I can't make pillows every year!

*****

I first saw a tutorial for salt-dough ornaments here and I loved them.  And then Darby blogged about them and so I knew I was onto something good :).  I decided to make the snowmen head salt-dough ornaments and use them as gift tags on our gifts this year.

Here are some pictures to show their production progression:


Super easy and a big hit among all recipients - they probably didn't want to hurt my feelings ;).


Thursday, January 6, 2011

Homemade Holidays 2010, Part 1

I have a lot of different projects that I want to share with you, and the best way I know how to do this is to split them up a bit as to not overwhelm either you or myself.  The next couple of posts will highlight some of the projects that I have been feverishly working on for this past Christmas.

If you remember from October, I shared with you that I was super excited to find Italian fabric for Stephen's Sicilian Noni.  I decided to make her a reversible apron for Christmas out of this fabric and it turned out great (obviously my mom helped me!)!  I used a Simplicity pattern, number 2091 - you can more than likely find this pattern at any craft store that sells fabric.
 Here she is translating her apron into English for us :). Even Stephen's dad enjoyed reading the words on the fabric.
 Proud of her Italian heritage and happy with her new apron!
And here is the other side of her reversible apron - she loved it!

*****

The next project that I tackled was one that I found in September.  I had to plan for weeks before Christmas to start on it as it involved growing time.  I decided to plant paperwhites as a gift for Stephen's Nana (his other Grandma) and for some friends.  I was inspired by this post at Young House Love and I followed their tutorial on how to do it.  I went to Hobby Lobby and purchased the glass holders and rocks/marbles (the holders were 50% off and I used a coupon for the rocks/marbles). I ordered my paperwhites from this seller on amazon.  I started planting 2 out of 3 of my pots the Tuesday after Thanksgiving.  I started them straight up, just as the tutorial told me to.  I gave them as gifts the 3rd week in December and they were just getting ready to bloom, as you can see from the pictures.
Paperwhites get really tall, and because of this they take a long time to bloom as they spend most of their early growth time gaining height.  I planted the 3rd pot (for Stephen's Nana) a little late and I decided to try and stunt it's growth.  I had read on the post from Young House Love that this was possible using alcohol (I used rubbing alcohol) and because I started the bulbs for her late, I knew I needed to speed up the process of the bloom.  I figured that if I stunted their growth, they'd bloom faster - it worked.  I followed this tutorial to properly keep Nana's paperwhites from growing really tall.

 Here are the paperwhites that I planted for friends.  They were taller than Nana's and they continued to grow even taller after they bloomed.  The picture on the right shows the start of a bloom.


 Here are Nana's paperwhites.  The stunting technique worked like a charm.  These paperwhites didn't grow as tall and they started to bloom much sooner because of it!  Another thing I noticed with the stunted bulbs is that more growth grew evenly out of each bulb (if that makes any sense).
  This was an EASY and neat gift to give to anyone.  It was inexpensive and different, although it did involve planning time (starting the bulbs in time for them to be close to blooming by the time they are given).  When I do these as a gift again, I am definitely going to stunt their growth as I loved the way the stunted paperwhites looked.

Another thing that I love about paperwhites both to grow and to give as a gift is that they're very low maintenance.  All you have to do is keep their water level (I used a mixture of water and alcohol for the stunted ones) at the very bottom of the bulbs - that's it.  Because they don't require a lot of water, you really only need to give them attention every 3-4 days - ANYONE can grow and care for them!

I hope I've somewhat inspired you to start thinking about what you can make for Christmas, 2011!  More ideas and inspirations to come!