Showing posts with label Painting. Show all posts

Thursday, February 28, 2013

A Bright Transformation

After 3 and a half years of not seeing eye-to-eye, Stephen and I finally caught up on the same page and made a big, unimportant purchase: we bought a new TV.  To some of you, this is no big deal....however, to me, this was HUGE!  That story, however, is for another day and another time...continuing on...
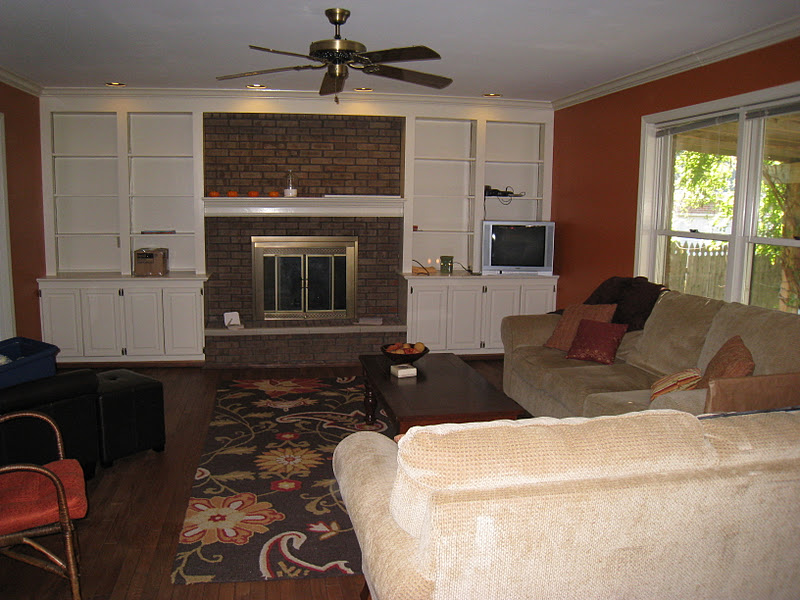
The reason I tell you about the new TV is because it called for a new place to set it up.  Our old TV used to sit to the right of our fireplace:


Here's the problem with this set-up: it was definitely NOT conducive to watching television while sitting on the couch.  Something had to give, especially now that we have a new television.  Some of you may be thinking, "Hang that television above the mantel!" but I just couldn't bring myself to do it...I really love being able to decorate the mantel during the different seasons, and after this summer, when I used a Pinterest inspiration to update the mantel, I really didn't want to mount a television in that decoration space.  Originally, I thought we could put the new TV to the left of the fireplace, but then Stephen pointed out that it would cover up a lot of our bookshelves...that's when the brainstorming occurred.  

After seeing a friend turn a dresser into a TV stand, and then seeing them all over Pinterest, I decided that I was now on the lookout for a dresser to transform myself (with the help of my dad and his tools, that is).  I didn't need just any dresser, I needed a small enough dresser to put in the nook to next to our french doors (where the chair is):


This nook is directly across from the sofa and provides a wonderful viewing area to watch the television from both the couch and the love seat.  And so the dresser hunt began.  I literally checked Craigslist daily for about 4 months before I hit, what I believed, to be the jackpot.  I picked up this little lady, who just happened to be the exact right size (40") and came with a mirror (which was repurposed for another area of our home - that's to come later) for $50.  Here she is:


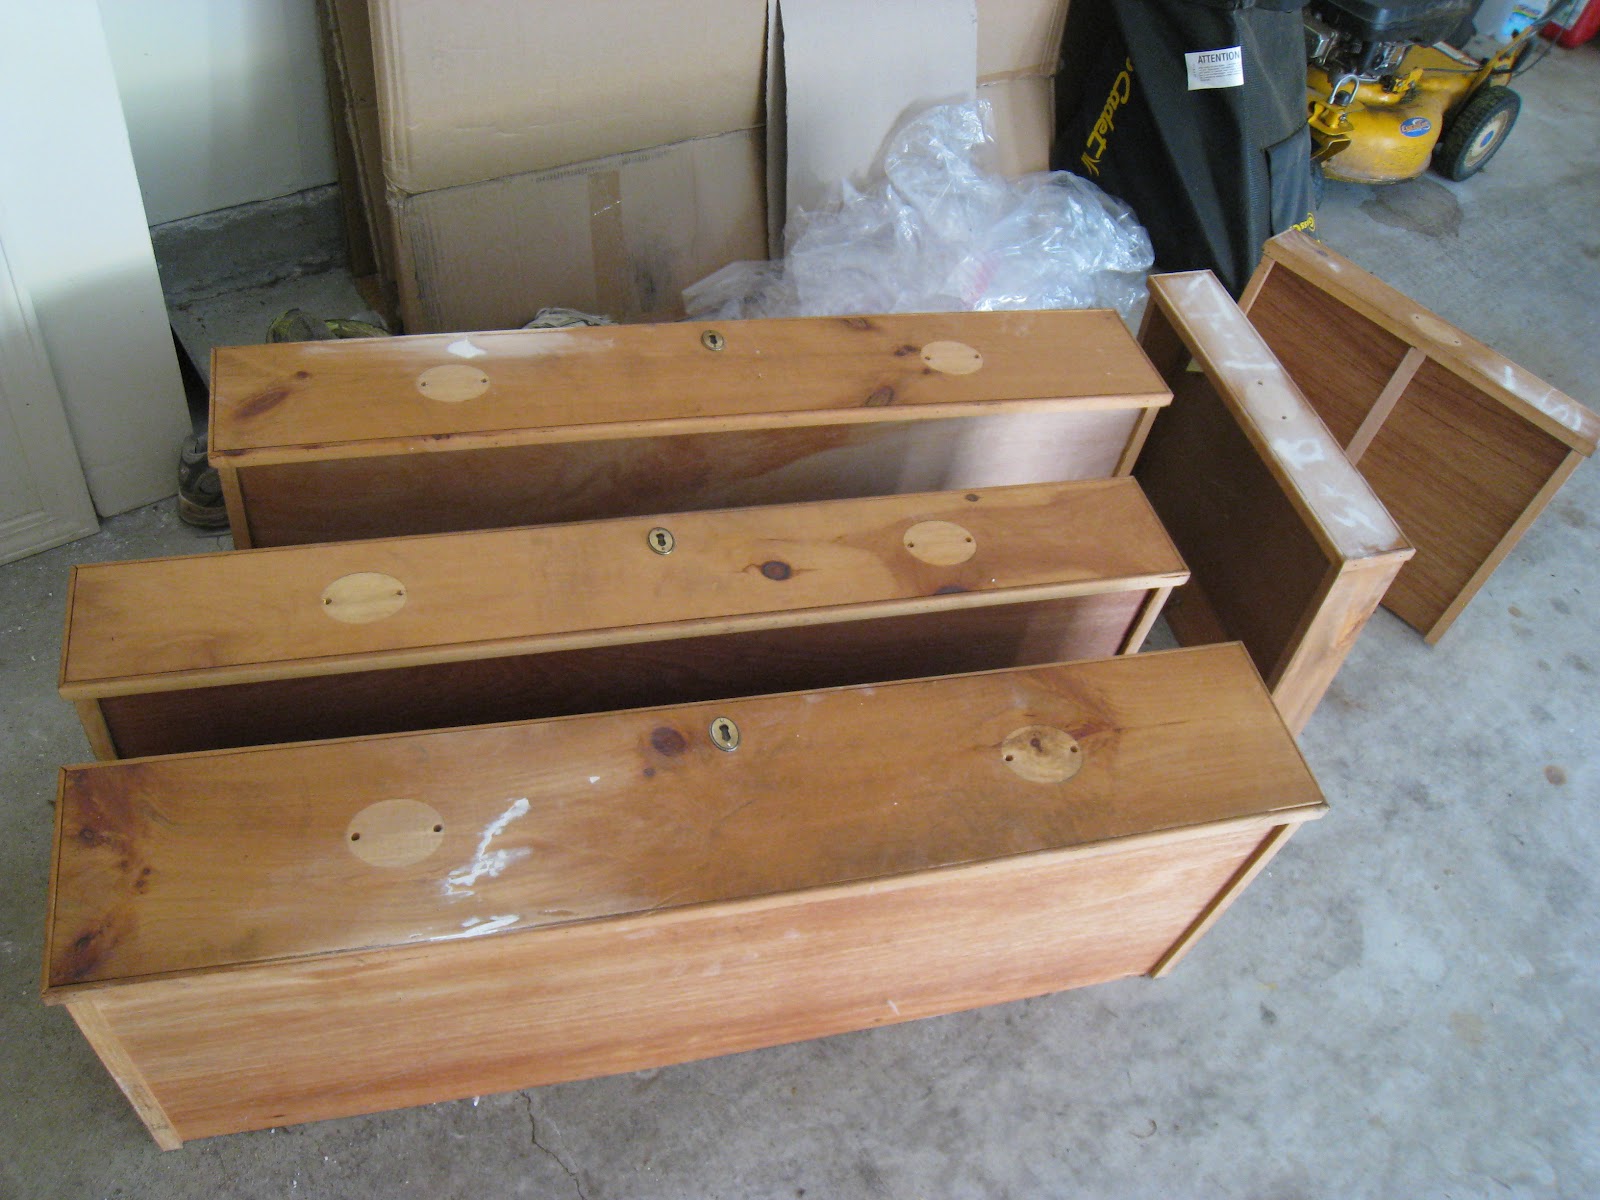
My original plan was to only remove the top drawer to use as a shelf for cable/dvd player and utilize the bottom two.  The only problem with this plan, was that when I got home, the drawers turned out to not be in as good of shape as I had previously thought...not to mention the whole thing was looking a little sad as I removed drawers:


Once I realized the condition of the drawers, I decided to only use the bottom drawer and to improvise with baskets where the second drawer originally was.  Here was the plan: remove the warped cardboard that separated each drawer and replace it where the first and second drawer had been with thick MDF that could act as a shelf.  I would then prime and paint the piece and call it a day...unfortunately it took a little bit longer than I had hoped, but nonetheless, the project is complete and I couldn't be happier!


I went to Home Depot and had 3/4" MDF cut to match the length and width of the bottom where the first and second drawers originally sat.  My dad helped me cut the small corners on these boards so that they fit perfectly inside the dresser.  He also helped me by attaching side supports on each side of the inside of the dresser so that the MDF had something to sit on all the way around it.  In order to get the boards in, we had to take the back and the top off the dresser - she looked a bit decapitated for awhile!  I filled in the hardware holes on the bottom drawer, because I only needed 2 holes (instead of the 4) for the new pulls.  
I followed Centsational Girl's advice and went with the Zinsser oil-base cover stain/primer, because the top of the dresser was a laminate.  I bought a cheap paint brush for the primer and then tossed it when I was finished to avoid the messy clean up.  I primed the pants off the dresser, and the new shelves, painted them and then put the drawers into place.  I put the bottom shelf into place and polyurethaned it before I put down the top shelf.  Once both the shelves had been polyed, I reattached the top and the front decorative pieces and then polyurethaned the entire dresser.  I decided to paint it "Yukon Gold" by Olympic to match my Ikea Hemnes Linen Cabinet (in case they ever ended up in the same room). 1 quart of paint was more than enough.
My dad then cut 4 holes into the back for cords to go through. The bottom drawer had to be reinforced and fixed, as it was falling apart.  My dad cut a thin piece of flat wood and added it to the bottom, inside of the drawer.  He also reinforced the sides and back by attaching thin pieces of wood with nails to the inside of the drawer.  Lastly, he put L-shaped brackets on either side of the drawers to hold it together.  You'd never know the drawer was in bad condition, unless you pulled it all the way out! 
The pulls I got at Home Depot for a couple bucks each, and the baskets are the perfect size and were purchased at Lowes.  When it's all said and done, I believe we spent a little more than $100 on this new TV stand and it fits and looks perfect in its new home:


Isn't she a beaut?!


Saturday, November 17, 2012

Dining Room Help!

Hi, my name is Kari, and I'm a fall-aholic.  As a result my house is busting at the seems with shades of oranges, yellows, reds, greens and browns.  Ever since our Chicago days, I've been trying to find a way to incorporate some cool hues into the mix of all things autumn.  A few weeks ago, while perusing Overstock.com, I found a rug that I really love and would like to incorporate it into our dining room.  

Our Dining Room (we are going to pull up the carpet and put down hardwood)

"The" Rug :)

I'm so pumped about this rug because it does exactly what I've been trying to do for these past couple of years: bring in some shades of blue. 
Now, here's where I need your opinion.  My mom and dad got new dining room furniture last year and graciously gave Stephen and I their old set.  We inherited a table, 6 chairs, a buffet, and a china cabinet from them.  Since they gave it to us, all but the table and chairs have been stacked up in our garage.  You see, the problem is is that I'm not feeling the current state of the furniture.  It needs some help...
The buffet and the bottom of the china cabinet, stacked on top of one another.

This past summer, Family Handyman magazine had an article on how to refinish furniture like a pro (specifically on how to stain your pieces darker).  After reading the article, I felt empowered and just knew that I wanted to darken the current stain and give the pieces more of a walnut look.  But then, I would see pictures of different two-toned furniture and I would fall in love with the way it looked...

(photo from here)

My Chicago friend posted on instagram a beautiful buffet that her friend found at the Salvation Army and refinished it by painting the bottom of it a grey and staining the top of it a dark stain.  I immediately fell in love with it was won over by this two toned look.  My new idea is to paint the bottom of my table and buffet a heathered blue to go with the blue in the rug, and then stain the tops of both pieces a dark, walnut stain.  Buuuuuuuuuuttttttt, there's a catch....
If I do try to accomplish the two-toned look, what can I do with my china cabinet to keep it from looking like a stuck out sore thumb?  Do I paint the whole thing or stain the whole thing?  Here's where you come in....
(photo from here)
What do you think of this two-toned china cabinet?  What if I painted the bottom the same heathered blue as I want to paint the rest of my furniture, and stain (just like in the picture above) a darker stain to match the top of my table and buffet?

If you have an opinion, I would love to hear it, as I don't know what I should do to refinish my furniture.  Should I stain it a darker stain and just keep things moving?  Should I do a two-toned finish using the clue from the rug on the bottom?  If I do that, what should I do with my china cabinet?  
Decisions, decisions!  What's a girl to do?! :)  Leave a comment and give me your opinion - I would love to hear it!


Monday, July 2, 2012

Bathroom Re-Do


You know the drill: you buy a house and you instantly inherit the style/design of the previous owners until you get the chance to make your house your house.  This was exactly the case with my half-bath/powder room on the first floor of our house.  The problem with this room is that nothing about it is what I would choose to put in my half-bath...nothing.  When we first looked at the house, I had already started thinking about what I could do to this room to update it and make it more of my own. Before I start breaking down my thoughts, let me share with you the actual room:
 
 Personal Problem #1 with this room: it's wallpapered.  Now, obviously these ferns are somewhat "in" right now (see PB and their fern towels) however, they're just NOT for me.  Unfortunately, Stephen says he likes these ferns...that caused a lot of need for discussion/begging/reasoning :-)

Personal Problem #2 with this room: the cabinet that eats up a ton of this tiny room and the 1980s faucet that adorns this vanity.  Both must go.  


Personal Problem #3 with this room: the ceiling is painted green.  Ugh. Thanks!  I'm not saying that you shouldn't paint your ceiling - I realize that a lot of designers will tell you that this is a great way to add color or points of interest to your room.  My problem with it is that this room is just so small - I'd prefer a white ceiling (again, personal preference).

Personal Problem #4 with this room: I do not like the chandelier in this bathroom.  Maybe it's the wrong design to go with light, maybe it's the fact that it's in the bathroom - I'm not quite sure what it is, but I'm just not feeling the chandelier.  Perhaps if it were in a different room with different design around it I could like the chandelier, but not in this context. 

Now let me introduce you to the new look I'm shooting for in this room:
I am giddy with excitement at the possibility that this room holds!  So excited that I went on ahead and got a little big for my britches...


I got the itch to remove the ferns and they came down super easily - almost too easily!  I'm fairly certain there's no going back now!

Any of you seasoned DIYers out there that have already updated a bathroom in your house and would like to share some good tips for a newbie like myself?  I'd love to hear your advice!


Friday, June 29, 2012

I Love Freebies!

Living in Chicago was SO awesome because I would be walking down the street and see something that someone else had put out for trash that I could see a treasure in.  I know that might disgust some of you, but let me settle your fears and tell you that NOTHING I have ever picked up off the street was in the actual trashcan or dumpster - all were just sitting on the side of the street next to the dumpster (not that I wouldn't contemplate pulling things out of the dumpster if the *right* item needed rescuing!).  I scored this awesome tray off the side of our street that someone else had deemed "trash", as well as this arm chair (Charlie the Chair, if you will....he's still awaiting to be 100% completed, although he's WAY more clothed now than this post leads you to believe).

In March, 2011 I was in our apartment getting ready for our trip to Salt Lake City to visit friends and go skiing.  Our apartment overlooked the side of a high rise building and I could see down into the area that was used for the dumpsters.  Next to these dumpsters, a certain piece of furniture caught my eye...

 I loved everything about this dresser - the size (it's a little bit higher than waist level), the drawers (I love the 2 smaller on top) as well as the pulls!  At this point in time, Stephen and I knew we were going to be moving back to Kentucky sooner than later and that a house was in our near future...furniture was going to be a must!  The only problem with this charming piece was the lack of a top piece of wood.  That's right ladies and gents, this dresser was topless!

{censored!}  Make sure you're 18 or older!!!

Despite Stephen's disbelief, this did not stop me from wanting this dresser to be mine.  My sweet husband went outside in the snow (it's March in Chicago) and carried this sucker down to the dungeon basement of our apartment building.  There it sat until the end of July when we were packing up our moving truck to head back to our Old Kentucky Home.  Our truck was literally filled to the brim and I almost lost this wonderful possession.  In fact, Stephen contemplated (I could see it in his face) trying to convince me to accept my loss and leave Debbie the Dresser in Chicago.  That moment only lasted a couple of seconds as I know he could read the longing on my face!

Fast forward to April, 2012 months after we have moved back to Louisville and Debbie (the Dresser) has been hanging out in our garage yearning for attention.  It was my Spring Break and I knew I needed to make room in the garage (my parent's old dining room furniture is also hanging out in there - even as I type...I haven't gotten around to tackling that monstrosity!).  So, if you ever come across your own slutty dresser that has lived a topless life and needs a face lift, here are the steps I followed:

1. Measured the opening in the top that was missing a wood piece.  Went to Home Depot and picked out a thick piece of wood and had them cut it to size ($18).  Used Elmer's Wood Glue ($6 - big bottle) to glue it into place and then used finishing nails (had them in my little kitchen nail kit from Target) to hammer it in around the perimeter.  

2. After attaching the new top piece, there was still some gaps around the existing trim and the new top.  I applied a liberal amount of wood putty ($8) to fill in the gaps.


3. I impatiently waited for this wood putty to dry and then I used sandpaper that I already had to sand down the wood putty I had put into the gaps.

4. I also used the same tub of wood putty to put on the drawers to fill in any scratches that I knew would be evident when I painted.  I also waited for this putty to dry and then sanded it down smooth.  (Before I did this, I removed the pulls)

5. My friend Jen told me about this blog where the blogger repainted her credenza.  I literally did exactly what she did, only I used a different color.  I went out and bought this Zinsser primer ($17) and I brushed it on, doing about 2 coats.


6. While I was waiting for the primer to dry, I pulled out some Krylon ORB spray paint that I already had on hand for this lamp project and I used it to spray paint the pulls for Debbie.


7. I used Rustoleum's High Performance Spray Enamel in White ($6 per can, I used 2 cans) to spray roughly 3 coats of white onto freshly primed Debbie.

8. I used a paint brush and sprayed the ORB spray paint onto a paper plate and then dabbed my brush into it to paint the keyholes without getting any ORB paint on my freshly painted drawer.

9. I did a thorough cleaning of the inside of Debbie (don't forget, she was a dirty dresser - that topless thang!) and then reattached my pulls.  I had my studly hubby (and a friend) carry face lifted Debbie up to her new home in our guest bedroom.


  The Price Breakdown:
-Dresser - free!
-Wood piece for top - $18
-Wood Glue - $6
-Wood putty - $8
-Primer - $17 (I bought a quart with lots left over)
-Spray Paint - $6/can, I bought 2 so $12
-Sand paper - had it so free!
-ORB spray paint - had it so free!
Grand Total: $61!  
Talk about a CHEAP piece of furniture!

What a transformation!!!
With a little elbow grease and paint!

Here is Debbie the Dresser enjoying her new life in the guest room:

What about you?  Have you found any treasures that someone else has put out for trash???  Tell me about your adventures!

I'm linking up with:

Monday, October 31, 2011

Catch-Up

Okay, so I've been a horrible blogger.  And by horrible, I mean HORRIBLE.  Things have been a little bit hectic here and when it came to blogging, it just had to take the back burner.  Before we moved into our new house, Stephen and I were living with my parents.  Our stuff was living at my parents house, in our new house, and in our storage unit.  I never had my camera cord whenever I needed it, which led to me not uploading pictures or blogging.  I'm considering my blogging vacation to be over, and I'm expecting to be back with a vengeance!

Just in case you're not completely bored out of your mind with pictures of our new house, I have somewhat updated pictures.  I took these pictures about 3 weeks ago, so while they're an update to you, they're not really an update because the rooms have improved so much more since these were taken.  However, I figured I'd share with you the ugliness that moving in, painting and situating things brings with it, so you can get a real picture of our C-R-A-Z-Y life right now.  Enjoy!


So we'll start with the first floor.  If you remember, when you walk into the front door, to your left is the Living Room, which we have converted into Stephen's office.  We snagged this solid wood antique desk and office chair off of craigslist for a steal, and I knew once I saw it and waited a week so I could talk the seller down, that it was just meant to be!
This is the view when you're standing in the Living Room/Office and you're looking out into the entry way
This is the view right when you walk into the Living Room/Office

Here is a view of the Living Room/Office from the french doors in the Family Room
If you know me, you know I'm totally NOT afraid of color.  I wanted to paint this office a color that would match our other color choices, and would go with my love for dark wood.  I didn't want to paint it a really dark color, and in real life, this green isn't as dark as it's appearing here.  I got all our paint from Lowes, and went with their Valspar brand.  We painted our apartment using this paint and I loved the results.  This color is Homestead Resort Moss.  In all the rooms that I have painted, I've also painted the trim as well.  I used a Porter Paint color, despite getting the paint at Lowes.  The color is White Umber.

Moving onto the Family Room.  If you remember, when you walk straight into the front door and to the back of the house, you walk into our Family Room.  I didn't think I was going to repeat the same orange that we painted in our apartment, but I loved it so much that I found myself going right back to it.  
Right when you walk into the Family Room, looking to the left
Looking into the Family Room from the french doors in the Living Room/Office
The Family Room, looking into the Kitchen
The orange paint is La Fonda Copper.

Here's our Kitchen, in it's crazy state.  This room is going to be the last room that I am going to paint.  I'm planning on painting it Cincinnatian Hotel Carl Tan, which is the same color that we painted our bathroom in Chicago.

Moving Upstairs...
This is our updated bedroom, which is at the top of the stairs to the right.  This is the same color that we painted our bedroom in Chicago.  It is called Olive Grove.  Now, let me tell you, it is not this green when you're looking at it in real life.  Also, with stuff hanging on the walls, the color is broken up.  In the near-er future, I'm hoping to DIY some crown molding up at the top of the walls/ceiling, which I know will help to chill out the green even more. 
This is standing in our bedroom, looking towards the bathroom (the door out is to the left, the door to the closet is to the right)
Here's our bed...if I pretend, it looks just like our room in Chicago (check it out here)

Walking down the hall...
Remember that pink room?  Well, it's now a calmer shade of tan!  This is a Porter Paint color that I got mixed at Lowes.  The color is Sea Sand.
Standing in the room, looking out into the hallway


Remember that farm mural room?  That room got a complete overhaul.  I chose this light shade of blue because it matched all my bedding that I had before I converted from a Miss to a Mrs. If you look in the corner, you can see that bedding :)  This color is New Day.
Here is a shot of the room looking out into the hallway

So, as you can tell, we've been busy little bees.  We've painted the family room, living room, and all three bedrooms; not to mention all the trim in the hallway.  Since these pictures were taken, I've begun tackling the dining room.  More to come on that later!  What about you?  Have you been doing any home projects lately?  How do you feel about painting???  I'm beginning to be annoyed with it...